Showing posts with label 12. Show all posts

Saturday, 28 March 2020

Chapter 12 // Exercise 13 - Principles & Practice Using C++

In this exercise I am using Visual Studio 2017 and the graphics files found here:
https://github.com/l-paz91/principles-practice/tree/master/Graphics%20Files

Chapter 12 // Exercise 13

Find a way to add color to the lines from the previous exercise. Make some lines one color and other lines another color or other colors.

Github: https://github.com/l-paz91/principles-practice/blob/master/Chapter%2012/Exercise%2013

A closed polyline is basically just a sequence of lines so in theory we should be able to set each line colour...in theory. The problem is that Shape only has 1 colour member that it uses for the entire object. Therefore we need to change the closed polyline to just lines so we can individually set each lines colour. It ended up a little hacky looking but it works.

Chapter 12 // Exercise 13 - Principles & Practice Using C++

Friday, 27 March 2020

Chapter 12 // Exercise 12 - Principles & Practice Using C++

In this exercise I am using Visual Studio 2017 and the graphics files found here:
https://github.com/l-paz91/principles-practice/tree/master/Graphics%20Files

Chapter 12 // Exercise 12

A superellipse is a two-dimensional shape defined by the equation
Look up superellipse on the web to get a better idea of what such shapes look like. Write a program that draws "starlike" patters by connecting points on a superellipse. Take a, b, m, n, and N as arguments. Select N points on the superellipse defined by a, b, m, and, n. Make the points equally spaced for some definition of 'equal'. Connect each of those points to one or more other points (if you like you can make the number of points to which to connect a point another argument or just use N-1, i.e., all the other points).

Github: https://github.com/l-paz91/principles-practice/blob/master/Chapter%2012/Exercise%2012/Exercise%2012%20-%20Complete

Eurgh; another mind blower. I was upset as well because there is nothing on super ellipses on Maths is Fun. After searching and failing to understand code examples dotted across the internet; I ended up watching this video which was extremely helpful:
https://youtu.be/z86cx2A4_3E

He does code in javascript but it's easy enough to adapt. Whilst trying to draw points in a circle I realised that we really need a way to add doubles to the mix as values were getting narrowed left right and centre (pun intended). I changed Point to use doubles instead and then had to change a couple other constructors in order for it to build. There will be many, many warnings though. Through following the video I managed to draw a circle using a Polyline:


The + 300 on each line is just to change the default centre from 0,0 to wherever you want it. From there he then showed that the formula we care about to make a super ellipse is this one from wikipedia:
I'm really glad he pointed this out and took the time to explain it as I think I understand now. Using these formulas we can easily write a function to create super ellipses given a, b and n.

The full code for this mini program can be found here:
https://github.com/l-paz91/principles-practice/blob/master/Chapter%2012/Exercise%2012/SuperEllipseProgram

Now for what doesn't really seem like the hard part anymore. The closed_polyline contains a vector of points. We can just choose to select every N points or so and add those points to another polyline.


This one took me a good 3+ hours but once I got into it I think it was one of the most enjoyable. As much as I love the command window it's so nice to be drawing things and doing cool shit with maths. I'm really sad.

Thursday, 26 March 2020

Chapter 12 // Exercise 11 - Principles & Practice Using C++

In this exercise I am using Visual Studio 2017 and the graphics files found here:
https://github.com/l-paz91/principles-practice/tree/master/Graphics%20Files

Chapter 12 // Exercise 11

Draw a series of regular polygons, one inside the other. The innermost should be an equliateral triangle, enclosed by a square, enclosed by a pentagon, etc. For the mathematically adept only: let all the points of each N-polygon touch sides of the (N+1)-polygon.Hint: The trigonometric functions are found in <cmath> (Section 24.8, Appendix B.9.2)

Github: https://github.com/l-paz91/principles-practice/blob/master/Chapter%2012/Exercise%2011/Exercise%2011%20-%20Complete

This exercise reminded me of when I first read some of the exercises in Chapter 4 way back in 2016; I was scared and convinced I couldn't do it. I'm also mathematically inept so the second portion of the exercise really threw me off. This was one of those exercises that really threw me out of my comfort zone and I had to go off and do some research to figure out what he was talking about.

I once again turned to Maths Is Fun to figure out what the hell I had to do.
https://www.mathsisfun.com/geometry/regular-polygons.html

After about an hour of reading and re-reading I managed to grasp that a regular polygon means everything is equal (I know, it's big brain time). The sides will always be the same length as all the others. With this in mind I started off by writing a little program that given the end points of a line, an angle and a length; it will draw the next line:
Chapter 12 // Exercise 11 - Principles & Practice Using C++

I was very happy when this worked. I'm terrible at this kind of stuff. You can find the code for this here:
https://github.com/l-paz91/principles-practice/blob/master/Chapter%2012/Exercise%2011/11.1

This is tedious though and error prone. Maths is Fun state how each point on a regular polygon can be found on the circumference of a circle. Therefore, given a centre point, radius and the number of sides, we can effectively work out each point in the polygon. These points can then be added to the Polygon type to draw one for us instead of using lines.

Chapter 12 // Exercise 11 - Principles & Practice Using C++

The code for this example can be found here:
https://github.com/l-paz91/principles-practice/blob/master/Chapter%2012/Exercise%2011/11.2

The important part is dividing the current side number by the overall number of sides each time to determine the next point. I am terrible at maths; I'm still not 100% sure how this is working. I eventually ended up adapting code from here to get this to work:
https://stackoverflow.com/questions/7198144/how-to-draw-a-n-sided-regular-polygon-in-cartesian-coordinates

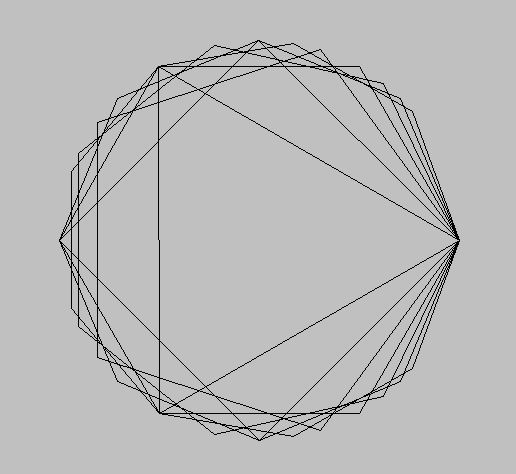
The last part was then putting this in a loop and drawing as many polygons as we can! What's interesting to note though is that at a certain point, you will have a pretty solid circle and will become difficult to pick out all the individual polygons:

10 Polygons:
Chapter 12 // Exercise 11 - Principles & Practice Using C++

20 Polygons:
Chapter 12 // Exercise 11 - Principles & Practice Using C++

After all that, this exercise took me a good 5 hours in total but I'm glad I finished it as this stuff is actually extremely useful for game development.

Another tip. You can change the rotation of the polygons by adding an angle to the new x an y co-ordinates in makePolygon(). Remember, the C++ standard library uses radians not degrees.
Chapter 12 // Exercise 11 - Principles & Practice Using C++

Chapter 12 // Exercise 11 - Principles & Practice Using C++


EDIT 29/03/2020: After letting my brain decompress, I realised that I still haven't actually done what he asked for in either scenarios. I hadn't placed polygons inside one another nor does each point touch the sides of the n+1 polygon. 

So, to draw polygons inside each other I modified the code slightly to increase the radius each time:


And to make it so all the points touch the sides of the outer polygon, then the radius of the inside polygon must match the radius of the apothem of the outer polygon...damn this makes me sound smart.

We know for sure the radius of the polygon so we can use this formula to find the apothem:
All the points can't actually touch the sides of the outer polygon otherwise they would no longer be regular polygons but now each polygon is perfectly sized to fit within the incircle circumference of the outer polygon:
Chapter 12 // Exercise 11 - Principles & Practice Using C++


Wednesday, 25 March 2020

Chapter 12 // Exercise 10 - Principles & Practice Using C++

In this exercise I am using Visual Studio 2017 and the graphics files found here:
https://github.com/l-paz91/principles-practice/tree/master/Graphics%20Files

Chapter 12 // Exercise 10

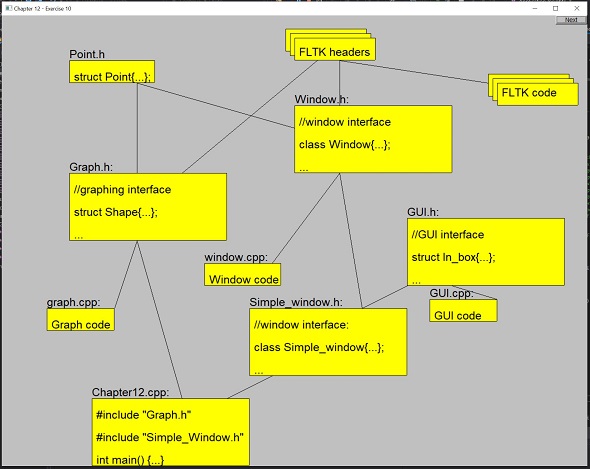
Draw the file diagram from section 12.8.

Github: https://github.com/l-paz91/principles-practice/blob/master/Chapter%2012/Exercise%2010

I really hate this man...why? Just why? This could be used as a form of torture. This took me an entire hour, not because it was hard but it was just painful. I haven't created little triangles at the end of each arrow because I just couldn't take it anymore.


Chapter 12 // Exercise 10 - Principles & Practice Using C++


Tuesday, 24 March 2020

Chapter 12 // Exercise 9 - Principles & Practice Using C++

In this exercise I am using Visual Studio 2017 and the graphics files found here:
https://github.com/l-paz91/principles-practice/tree/master/Graphics%20Files

Chapter 12 // Exercise 9

Display an image in the screen, e.g., a photo of a friend. Label the image both with a title on the window and with a caption in the window.

Github: https://github.com/l-paz91/principles-practice/blob/master/Chapter%2012/Exercise%209

.


Monday, 23 March 2020

Chapter 12 // Exercise 8 - Principles & Practice Using C++

In this exercise I am using Visual Studio 2017 and the graphics files found here:
https://github.com/l-paz91/principles-practice/tree/master/Graphics%20Files

Chapter 12 // Exercise 8

Draw the Olympic five rings. If you can't remember the colours, look them up.

Github: https://github.com/l-paz91/principles-practice/blob/master/Chapter%2012/Exercise%208

Oh man, since I got PNG images working in the last exercise, the temptation to just download a png of them and display it was so strong but it's not the point of the exercises so I did it the "right way". This exercise is pretty easy; the only thing that annoys me is that you can't get the rings to only overlap once to give it that "interlocked effect".


Sunday, 22 March 2020

Chapter 12 // Exercise 7 - Principles & Practice Using C++

In this exercise I am using Visual Studio 2017 and the graphics files found here:
https://github.com/l-paz91/principles-practice/tree/master/Graphics%20Files

Chapter 12 // Exercise 7

Draw a two-dimensional house seen from the front, the way a child would: with a door, two windows, and a roof with a chimney. Feel free to add details; maybe have "smoke come out of the chimney.

Github: https://github.com/l-paz91/principles-practice/blob/master/Chapter%2012/Exercise%207

I wanted to add some clouds and grass to this and thought it would be easy however I got an error when drawing saying "PNG images are unsupported". FLTK does actually support png however we are using Bjarne's "version" of fltk and if you go to Graph.cpp (line 378) you'll see that he's only supported the use of two file formats; jpg and gif. So, I decided to add png.

First add #include <Fl/Fl_PNG_Image.H>  to fltk.h. Then in Graph.h add another enum type to Suffix::Encoding called png. In init_suffix_map() in Graph.cpp, add two more entries for png.

In Graph.cpp, in the Image constructor, add another case for png (basically copy pasta but change the name).

And then last, go to the project properties->linker->input->additional dependencies. Click edit and add fltkpngd.lib and fltkzlibd.lib

Png images now work with Bjarne's Image class! Once that was working; I got lazy....super lazy. And so I made the house in Photoshop, saved it as png and then loaded it.


Looks legit right? I could've just done the entire thing in photoshop...then loaded it as a normal png but I don't think that was the point of the exercise, or was it?

Saturday, 21 March 2020

Chapter 12 // Exercise 6 - Principles & Practice Using C++

In this exercise I am using Visual Studio 2017 and the graphics files found here:
https://github.com/l-paz91/principles-practice/tree/master/Graphics%20Files

Chapter 12 // Exercise 6

What happens when you draw a Shape that doesn't fit inside its window? What happens when you a Window that doesn't fit on your screen? Write two programs that illustrate these two phenomena.

Github: https://github.com/l-paz91/principles-practice/blob/master/Chapter%2012/Exercise%206

The window draws at 0,0 and then continues on. You won't be able to see the window label though. As I have two monitors, the window extended onto the second one.


The shape will be cut off wherever it hits the edges of the window.


Friday, 20 March 2020

Chapter 12 // Exercise 5 - Principles & Practice Using C++

In this exercise I am using Visual Studio 2017 and the graphics files found here:
https://github.com/l-paz91/principles-practice/tree/master/Graphics%20Files

Chapter 12 // Exercise 5

Draw a red 1/4-inch frame around a rectangle that is three-quarters the height of your screen and two-thirds the width. 

Github: https://github.com/l-paz91/principles-practice/blob/master/Chapter%2012/Exercise%205

Eurgh, I had to get the calculator out for this one. I hate doing percentages.


Thursday, 19 March 2020

Chapter 12 // Exercise 4 - Principles & Practice Using C++

In this exercise I am using Visual Studio 2017 and the graphics files found here:
https://github.com/l-paz91/principles-practice/tree/master/Graphics%20Files

Chapter 12 // Exercise 4

Draw a 3-by-3 tic-tac-toe board of alternating white and red squares.

Github: https://github.com/l-paz91/principles-practice/blob/master/Chapter%2012/Exercise%204

I got confused on this just because I started over-complicating it. I started thinking of creating it as 8 lines that intersect but pondered about how to colour the parts in-between. Instead I decided to create a function that creates and fills a rectangle with just the top left co-ordinate given. 

I also don't like how set_color() means set the line colour. To me it's quite ambiguous and alludes to the fill colour more.

Another thing, you can't return any object that is a type of Shape as its copy constructor has been explicitly deleted. MSDN says people do this to prevent behaviour that they don't want but in this case I can't see why creating a rectangle and then returning it would be so heinous. Clearly it was done for a reason, however, I decided to be naughty and commented out the line in Shape (in my files it's lines 176 and 177).

After a frustrating 20 minutes of nothing appearing I was ready to just give up and do it the long way, however, when stepping through the code, the rectangles were being created and attached to the window in the for loop, but, on the last rectangle all the values got cleared in the window and therefore nothing was drawn. For some reason a range-based for loop 'resets' the window's shapes. I think it has something to do with Shape's default destructor being called as r will only be in scope during the loop. Anyway, a standard for loop works fine and we don't have to repeat rectangle code constantly.

(16/08/2021 - Note from future me...it didn't work because you allowed it to use the copy constructor which had been deleted...creating a copy that goes out of scope.....)


Chapter 12 // Exercise 4 - Principles & Practice Using C++

(This is very umbrella looking.....)

Wednesday, 18 March 2020

Chapter 12 // Exercise 3 - Principles & Practice Using C++

In this exercise I am using Visual Studio 2017 and the graphics files found here:
https://github.com/l-paz91/principles-practice/tree/master/Graphics%20Files

Chapter 12 // Exercise 3

Draw your initials 150 pixels high. Use a thick line. Draw each initial in a different colour.

Github: https://github.com/l-paz91/principles-practice/blob/master/Chapter%2012/Exercise%203

I found how to change the width of the line by looking up the type in Graph.h. One of the constructors for Line_style takes a Line_style_type and an integer for the width.


Tuesday, 17 March 2020

Chapter 12 // Exercise 2 - Principles & Practice Using C++

In this exercise I am using Visual Studio 2017 and the graphics files found here:
https://github.com/l-paz91/principles-practice/tree/master/Graphics%20Files

Chapter 12 // Exercise 2

Draw a 100-by-30 Rectangle and place the text "Howdy!" inside it.

Github: https://github.com/l-paz91/principles-practice/blob/master/Chapter%2012/Exercise%202

This uses just a bit of trickery; as looking at the code; there doesn't appear to be a way to "attach" the text to the Rectangle..yet. I'm sure that is something he'll have us implementing.


Monday, 16 March 2020

Chapter 12 // Exercise 1 - Principles & Practice Using C++

In this exercise I am using Visual Studio 2017 and the graphics files found here:
https://github.com/l-paz91/principles-practice/tree/master/Graphics%20Files

Chapter 12 // Exercise 1

Draw a rectangle as a Rectangle and as a Polygon. Make the lines of the Polygon red and the lines of the Rectangle blue.

Github: https://github.com/l-paz91/principles-practice/blob/master/Chapter%2012/Exercise%201

It's weird to think that tediously defining each line of a polgon was the standard in games programming 25 years ago.


Sunday, 15 March 2020

Chapter 12 // Drill 2, 3 - Principles & Practice Using C++

In this exercise I am using Visual Studio 2017 and the graphics files found here:
https://github.com/l-paz91/principles-practice/tree/master/Graphics%20Files

Chapter 12 // Drill 2, 3

Now add the examples from section 12.7 one by one, testing between each added subsection example.

Go through and make one minor change (e.g, in color, in location, or in number of points) to each of the subsection examples.

Github: https://github.com/l-paz91/principles-practice/tree/master/Chapter%2012/Examples

Ah, so I already followed along with the book and did these (it was how I realised that the files don't work). The link above is the full code from the sections with some images that I added. As I was completing the examples I wrote some notes on them here:
https://lptcp.blogspot.com/2020/03/notes-on-examples-in-chapter-12.html
(Extras just in case:)
Setting up FLTK:

Fixed graphics files (this one took me a few hours):


Saturday, 14 March 2020

Chapter 12 // Drill 1 - Principles & Practice Using C++

In this exercise I am using Visual Studio 2017 and the graphics files found here:
https://github.com/l-paz91/principles-practice/tree/master/Graphics%20Files

Chapter 12 // Drill 1

Get an empty Simple_window with the size 600 by 400 and a label My Window compiled, linked, and run. Note that you have to link the FLTK library as described in Appendix D; #include Graph.h and Simple_window.h in your code; and include Graph.cpp and Window.cpp in your project.

Github: https://github.com/l-paz91/principles-practice/blob/master/Chapter%2012/Drill%201

This is quite possibly, the hardest exercise in the entire book if you have no experience with linking libraries. Fortunately, we had to use DirectX all throughout my uni course and I had to learn how to compile library binaries when starting SNES development so I wasn't completely stumped. The other annoying set back is the files you need are out of date and versions of FLTK numbered 1.1.x (as recommended in the book) no longer compiles on modern pc's. 

So, I've already written a few posts on how to get set up for this chapter so I'll link the appropriate ones here.

Setting up FLTK:

Fixed graphics files (this one took me a few hours):

EDIT 01/01/2021
I've now added a full project zip to github for this exercise:

Please make sure to use Simple_window2.h and not the original if you have reached this stage. I recommend downloading Bjarne's new files from here:

Errors you may encounter:
1>c:\users\lj\documents\fltk\fltk-1.3.5\fl\x.h(37): fatal error C1083: Cannot open include file: 'X11/Xlib.h': No such file or directory

I never encountered this on my first run and then I just kept using the same project. However when going over this again to create a new project I got this new error. Basically, if you double click on the error it takes you to x.H and it's complaining that it does't know what <x11/xlib.h> and friends are.

If you look a little further up on line 29, you'll notice that it hits these includes if we are not in WIN32 mode. If you are doing these exercises on Windows, it should know what WIN32 is, if it doesn't it means it cannot find the definition for the macro WIN32. This is defined in Windows.h which is included in the std_lib_facilities.h file. To fix these errors, simply put std_lib_facilities.h/windows.h before <Fl/fl...> includes (or "fltk.h"). 

I don't know why this isn't causing issues on my original project as the settings are all the same. Computers....

Friday, 13 March 2020

Notes on the examples in Chapter 12 Programming:Principles and Practice Using C++

So I've started reading through Chapter 12 and just trying to get the first example shown a page in took me a while. Therefore, I'll be leaving comments and fixes in this post for anyone else who may have struggled.

In order to get the program running in the first place you'll need some files made by Bjarne himself. I spoke about these in a previous post and fixed them up and posted them to my Git. There were a lot of errors as, due to time they have become wildly out of date.

These cleaned up files can be found here:
https://github.com/l-paz91/principles-practice/tree/master/Graphics%20Files

And I wrote about this process in detail here:
https://lptcp.blogspot.com/2020/03/programming-principles-practice-fixing.html

I wrote a guide for installing FLTK here as well:
https://lptcp.blogspot.com/2020/03/how-to-install-fltk-for-use-with.html

12.3 - A First Example pg 415
Due to namespace ambiguity, it's probably best if you avoid using namespace Graph_lib. In the first example in 12.3, Polygon is considered ambiguous and requires Graph_lib even though the using keyword has been set.  That was the only issue I had for the first example.

12.7.3
Initially, the axis drew as light grey on my screen. I tried looking for the definition but I couldn't seem to find where it is initially set to use grey, so I just left it. I then remembered that we're supposed to be hitting "next" after every example to show it building up. The key is to make sure you have win.wait_for_button() after every example. The axis shows as black after that.

I also noticed that the canvas label disappears after the first screen. Odd. (edit 30/09/2020 - I ended up fixing this here: https://lptcp.blogspot.com/2020/08/notes-on-chapter-15-principles-practice.html)

12.7.5 - 12.7.6
Both Rectangle and Polygon will need their scope (Graph_Lib) when using them. Even if you have using namespace Graph_lib;

12.7.7
The green shade is much brighter than the one printed.

12.7.10
Ellipse also needs Graph_lib::

You can find the full code and images I used here:
https://github.com/l-paz91/principles-practice/tree/master/Chapter%2012/Examples

Thursday, 12 March 2020

Programming: Principles & Practice - Fixing Files for Chapters 12

Chapter 12 had quite a bit of setup to get it working (and to be able to complete the exercises). Bjarne never actually mentions that you need to download extra files in order to get his examples working. He says at the start of the exercises "you need these" but doesn't give any other information. You can find the custom classes he's created here:

Not all of these are necessary for the graphics chapters. I have a few notes on getting them to compile though as they are hilariously outdated and the internet only turned up bits and pieces for working versions, so I begrudgingly spent an entire evening going through every bloody error. You can find the cleaned up versions on my github however, in the interest of knowledge, try going through and fixing the files.

1 - There are 2 Gui.h (one is all capitals). Use the uppercase GUI.h.

2 - Simple_window.cpp relies on a custom constructor for the next_button(Point()) member. This has been commented out in the code. In Point.h un-comment the two commented out constructors.

3 - Graph.cpp is a red mess.

  • Include Window.h at the top. 
  • Around line 316, change bool can_open to ifstream can_open.
  • In Graph.h add #include <FL/fl_draw.H> and <FL.Fl_Image.H> for reasons. And yes, the f and the is lowercase for some absurd reason and one contains a slash, the other a dot....
4. Simple_Window has two versions of wait_for_button(). In Simple_window.h change void wait_for_button() to void wait_for_button_modified(). Then add  bool wait_for_button();  above it. (This is because, at the time of writing this, I'm not sure if the modified version will be used at some point).

5. Simple_Window has two definitions for it's constructor. Delete the one in the header file and replace it with:
  • Simple_window(Point xy, int w, in h, const string& title);
6. Window is the Windows handle for a hwnd, files are not happy about this. Put all the code in namespace Graph_lib {code here} for the following files:
  • Simple_Window.h
  • Simple_window.cpp
7. Simple_window...again. 
  • next() already has a body. Delete the body from the .h file so it just reads void next();
  • cb_next() also already has a body. Delete the one in the cpp file as, with a quick glance, the one in the header looks safer; pointer usage wise that is.
8. They're not errors but all the mismatch warnings are annoying me. Regardless of how annoying they are, the phrase "if at first you don't succeed, #pragma disable warning" is not the approach to take...(as much as I want to). Where it says '<' signed/unsigned mismatch; changed the int to unsigned int (or remove the unsigned) till the warnings go away. 

There are two more warnings on Graph.cpp warning about conversion from double to int...seeing as how Point only uses ints I'm guessing floating point maths is not allowed so I wrapped the second part in a static_cast<int>(u.first*(p2.x - p1.x)); etc. 

9. Only two errors left. Graph_lib::Menu::Menu(...) already has a body (of course it does). Delete the one in the cpp file (they're the same...practically). And fixing that fixed the last error and it builds...YEAHHH.


Alright, I think that will do for the evening. I've been sat here for 2 hours just trying to do the bloody example a page into the chapter. 

Full code files:

EDIT 14/12/2020
I've just realised, I never posted the original cleaned up version of SimpleWindow.cpp...Whoops. I never saved the original copies but over Christmas break I'll fix up a new copy.

EDIT 01/01/2021
The link to Bjarne's original files above no longer works...It took me a good 10 minutes to navigate his website and realise that the old files are now provided as a zip file here:

He notes that they were recovered from the loss of his previous website which must've gone down sometime last year. These new files are slightly different to ones I downloaded; they appear to be newer. This batch does not contain a Simple_window.cpp as everything is defined in the header:

Wednesday, 3 August 2016

Chapter 4 // Exercise 11, 12, 13, 14, 15 - Principles & Practice Using C++

In all these exercises I am using Visual Studio Community 2015 and the header file "std_lib_facilities.h" which can be found here:


http://www.stroustrup.com/Programming/PPP2code/std_lib_facilities.h


My version is spelt differently so adjust the code accordingly if copying and pasting.


Chapter 4 Exercise // 4.11

Create a program to find all the prime numbers between 1 and 100. One way to do this is to write a function that will check if a number is a prime (i.e., see if the number can be divided by a prime smaller than itself) using a vector of primes in order (so that if the vector is called primes, primes[0]==2, primes[1]==3, primes[2]==5, etc). Then write a loop that goes from 1 to 100, checks each number to see if it is a prime, and stores each prime found in a vector. Write another loop that lists the primes you found. You might check your result by comparing your vector of prime number with primes. Consider 2 the first prime.

#include "stdafx.h"
#include "std_lib_facilities_new_version.h"
using namespace std;

vector<int> user_primes; // vector to put found primes into
vector<int> primes{ 2,3,5,7,11,13,17,19,23,29,31,37,41,43,47,53,59,61,67,71,73,79,83,89,97,}; // to compare against

bool isItPrime(int n) 
{
for (int p = 0; p < user_primes.size(); ++p)
{
if (n % user_primes[p] == 0)
return false;
}
return true;

}

int main()
{
user_primes.push_back(2);

for (int i = 3; i <= 100; ++i)
{
if (isItPrime(i))
user_primes.push_back(i);
}

for (int i = 0; i < primes.size(); ++i)
{
cout << primes[i] << '\t' << user_primes[i] << '\n';
}

keep_window_open();

return 0;
}

I spent so many hours trying to solve this one, so many hours scouring the internet but they all solved it using methods that hadn't been taught yet. I then even found Bjarne himself answer this question using methods he had fucking taught yet (talk about not even reading your own book). The way the question is written it sounds like he is implicitly asking you to check all numbers from 1 to 100 are prime by dividing them by a smaller number from within another vector called primes containing primes numbers from 1 - 100. Talk about misleading. He actually wants you to just write a function that finds a prime and then returns that number into a vector. 

So basically I had to end up using a bool function which I still don't fully understand. In chapters 1 - 4 all he has said is that a bool is true or false. I also had to start at 3 otherwise it would never work (even though he says to start at 1 in the book, his own website solves this starting at 3. I was rage quitting for hours). So it checks to see if the number is divisible by any primes already pushed back (so obviously, primes smaller than itself).

For a better understanding of bool values, look here. This is the website I use when Bjarne makes no fucking sense. The author Alex, makes things much easier to understand. 

This was a terribly written exercise.

Chapter 4 Exercise // 4.12

Modify the program described in the previous exercise to take an input value max and then find all the prime numbers from 1 to max.

#include "stdafx.h"
#include "std_lib_facilities_new_version.h"
using namespace std;

vector<int> user_primes; // vector to put found primes into
vector<int> primes{ 2,3,5,7,11,13,17,19,23,29,31,37,41,43,47,53,59,61,67,71,73,79,83,89,97,}; // to compare against

bool isItPrime(int n)
{
for (int p = 0; p < user_primes.size(); ++p)
{
if (n % user_primes[p] == 0)
return false; // n divided
}
return true; // n couldn't be divided

}

int main()
{
user_primes.push_back(2);

cout << "Please give a maximum number the computer should stop finding primes at:\n";
int max;
cin >> max;

for (int i = 3; i <= max; ++i)
{
if (isItPrime(i))
user_primes.push_back(i);
}

for (int i = 0; i < user_primes.size(); ++i)
{
cout << '\n' << user_primes[i];
}

cout << '\n';
keep_window_open();

return 0;
}


Chapter 4 Exercise // 4.13

Create a program to find all the prime numbers between 1 and 100. there is a classic method for doing this, called the "Sieve of Eratosthenes." Write your program using this method.

At this point in my programming knowledge, I honestly don't know how to do this using only methods he has shown us so far in the book. I've looked everywhere and I just don't understand whats going on. If someone could perhaps explain it to me in dunce terms that would be greatly appreciated but until I'm a more proficient programmer the answer to this one (and below) will have to wait.

EDIT 17/09/2019 - 3 years later I have now completed exercises 13 & 14. You can find the code for them at my git repository: https://github.com/l-paz91/principles-practice/tree/master/Chapter%204

I followed the pseudocode given on Wikipedia here: https://en.wikipedia.org/wiki/Sieve_of_Eratosthenes#Algorithmic_complexity

This time is took me around 30 minutes to solve and I'm quite happy to see just how much my ability to read other code (pseudo or not) has progressed. It also is very possible to do this exercise using methods only shown up to chapter 4 but my problem solving skills were not as developed. I still have a long way to go but I've improved. 

Basically though, this method is quite a contrived way of doing it but I understand why he made us do it. I don't fully understand how it works, but the pseudocode is simple enough to follow to get it working.

Chapter 4 Exercise // 4.14

Modify the program described in the previous exercise to take an input value max and then find all the prime numbers from 1 to max.


Chapter 4 Exercise // 4.15

Write a program that takes an input value n and then finds the first n primes.


#include "stdafx.h"
#include "std_lib_facilities_new_version.h"
using namespace std;

vector<int> user_primes; // vector to put found primes into
vector<int> primes{ 2,3,5,7,11,13,17,19,23,29,31,37,41,43,47,53,59,61,67,71,73,79,83,89,97,}; // to compare against

bool isItPrime(int n)
{
for (int p = 0; p < user_primes.size(); ++p)
{
if (n % user_primes[p] == 0)
return false; // n divided
}
return true; // n couldn't be divided

}

int main()
{
user_primes.push_back(2);

cout << "What number do you want to find primes from?: \n";
int countFrom;
cin >> countFrom;

double maxPrime = countFrom * 100;

for (int i = 3; i <= maxPrime; ++i)
{
if (isItPrime(i))
user_primes.push_back(i);
}

int countTo = countFrom*2;

for (int i = countFrom-1; i <= countTo-2; ++i) //this starts at n and continues n times
{
cout << '\n' << user_primes[i];
}

cout << '\n';
keep_window_open();

return 0;
}

I was a little confused on this one for a while as I thought he meant enter a number (n) and then find that many primes starting from the beginning. But then I realised that was exactly the same as 4.12, so he actually meant start at 'n' and then find the next 'n' numbers from 'n'. 

After some messing around it wasn't too hard, the function to find primes doesn't actually need to be tinkered all that much, you just need to make sure that it finds enough primes to print out.