
It's starting to get to the point in my exercises for Principles and Practice, that I'm missing important things out because I'm not testing my code properly. This is because 1) I'm lazy, and 2) I'm lazy. At work, we use a variety of unit tests, map tests, asset audits and other things to try and catch code that could break the build if submitted. Granted, some things get through; there will always be edge cases. But for the most part; automated tests can save you a lot of time and sanity.
Creating a Google Test Project
First create a new project using the google framework. I'm using Visual Studio 2019 which has Google Test already integrated. Earlier versions may need it installing via the VS Installer.

Give it a name.
On the next screen you can choose to dynamically link or statically link. I left it on the defaults but you can read about why you might want to change here: https://docs.microsoft.com/en-us/cpp/build/dlls-in-visual-cpp?view=msvc-160

Once your project has opened, you may notice there is no main(). Unit tests don't need a main. You can even link this project to your current one and then import the files you want to test but that's getting ahead. Simply build the project; it should build with no errors. Then open up the test explorer found in View->Test Explorer. I like to dock it to the side where the solution explorer is and you can easily tab between the two.

You need to build it for new tests to show up there. Here it's showing the test "TestName". This simple test expects 1 to be equal to 1 and expects true to be true; difficult stuff. If you run the test by pressing the green arrow in the test explorer you can see that it turns green with a tick as 1 is indeed equal to 1 and true is true.


Let's change this up a bit. I'll make a new test. Here I've added a function that adds numbers together. I'm testing that it works correctly by expecting the appropriate answer.

I suggest making some simple tests in this project to get used to the different macros within google test. You can read more about those here:
Google actually has some excellent documentation.
Adding Google Test to Your Current Project
Right click on the solution name of the project you're working in. Choose Solution->Add->New Project.

Here scroll down and choose Google Tests. Hit next. Give the project a name and a location. When you hit next this box will appear:

Now you can choose a project to test from the drop down box (very handy). The best part about choosing the project is that your test project will automagically reference the chosen project; no need to mess about doing it manually.
Your solution explorer will now look something like this:

Now I want to test my code. Currently I'm creating vectors of different types and entering data in the console window whilst the program is running to test different input. But what if I could do this with tests?
To get hold of my header file with the functions I want to test, I'm going to add the solution directory to the test solution. Right click on the Test solution and choose properties.
In here go to C/C++ -> General -> Additional Include Directories -> Edit

Click the folder icon. 3 dots will appear below; click them and navigate to the folder where your project is. Hit ok, then apply and ok again.


Now you should be able to include files from your project without having to give the full directory.
Using Google Test
As an example, I had an exercise to provide input and output operators to std::vector. When I put the code up, I would like others to see the types of tests I've done so they to can try those tests and hopefully it should also make the code easier to understand. Here I want to test that strings with whitespace are correctly read in as one variable instead as pushed back as multiple. I've created 3 test strings and read them into the vector. This should produce 3 entries in the vector:

I then ran the test in the test explorer and it failed with this extremely handy output:

I don't need to do any debugging in the console window now as I clearly know that my input overload function is not reading strings with whitespace as one variable.
Looking at that code I can see why:

It will read into a variable and then push that variable back so long as the stream isn't bad. I can change this now to read into the variable using getline() and use stringstream to convert the string into the correct type. There is another problem though; as this is templated I can't directly convert the stringstream into a string (it will just put 1 word into the variable if I do stringstream >> variable). So I added another overloaded function for string types.

There are lots of other tests I could write for this scenario; ones for integers, ones for chars and floats. All those tests will get repetitive though so you could create a templated test and run those instead. This is quite simple. I just templated my original test and gave it some inputs via the constructor: 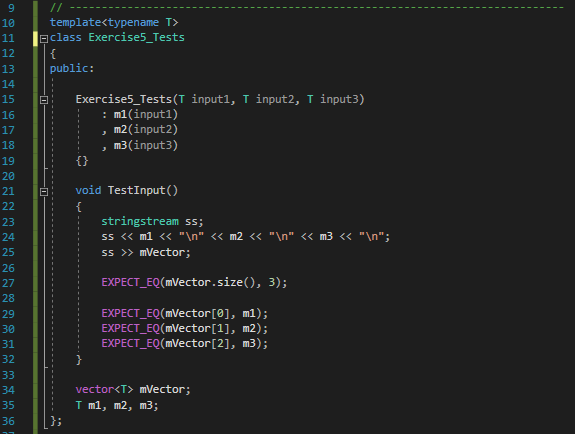
Then created new tests with the different types and input:


(Line 40) First, create a fixture class that derives from testing::Test. I left mine empty because I wanted to continue using Exercise5_Tests<> in my tests instead, but you need this base class to define the parametized tests.
(Line 49 - 56) Then you define your test. It can be repeated as many times as you want. I only have 1; InputIsCorrect, but you can add another. Just make sure the first parameter matches the name of you base class for this test suite. I added some code as an example.
(Line 58) The tests now need to be registered. You don't need a call to this macro for each test name. If you have more than 1 test you can register them like so:
REGISTER_TYPED_TEST_CASE_P(VectorInputTests, InputIsCorrect, AnotherTest, AThirdTest)
(Line 60 - 61) Let the test suite know what types to run the test with. I supplied int, float and double. So Google test will create 3 versions of InputIsCorrect, replacing TypeParam with one of these types.
My tests are extremely basic and not really worth it but they're useful for learning about google tests and getting used to writing them. One of the hardest parts of my job is not actually writing/creating features but it's testing them. In production code, type parametized tests could catch errors if someone decides to create a templated type with a type it's not supposed to be. Of course that does rely on the user adding that type to the tests....this is where testing fails us sometimes.
A more useful example would be a type of AI in a video game. The AI could all be fundamentally different; a zombie, an NPC or a dog but let's pretend they all inherit an interface that allows them to calculate the players position and move towards them. Instead of writing individual tests for each type, you write one test, call the necessary function (it could be MoveTowardsPlayer()) and observe the output.
// Debugging
If you have written a test and you're not sure why it's failing, you can debug through the test which is extremely useful. Place your breakpoints then right click on the test name in the explorer and choose debug instead of run. It saves a lot of time giving your code what it needs to run instead of having to manually get it into the failing state.
Sometimes this might happen:

I find that building hangs for some reason. I just clean the solution and build again and that usually fixes it.
Make sure to read the the docs:
They're actually useful. I'd say Google Tests is similar but different enough to the unit tests we use at work but after an evening of tinkering I found the test suite very easy to use. Engines like Unreal have there own testing framework built in; that's the one we use (albeit it's been modified). You can read more about UE4's testing suite here:
And last, here's a great talk from one of our engineers about testing and why you should use it:
Happy testing!
Here's a link to the full test file: