Wednesday 30 September 2020

Chapter 17 // Exercise 7, 8 - Principles & Practice Using C++

In this exercise I am using Visual Studio 2017 and the std_lib_facilities header provided by Stroustrup.

Chapter 17 // Exercise 7, 8

7. Write a program that reads characters from cin into an array that you allocate on the free store. Read individual characters until an exclamation mark (!) is entered. Do not use a std::string. Do not worry about memory exhaustion.
8. Do exercise 7 again, but this time read into a std::string rather than to memory you put on the free store (string knows how to use the free store for you).

Github: https://github.com/l-paz91/principles-practice/blob/master/Chapter%2017/Exercise%207,%208

There's no need to re-invent the wheel here as cin will do all the hardwork for you, all you need to do is supply it with a maximum stream buffer size. Back in chapter 7, we extensively used cin.get() during the creation of the calculator. cin.get() has quite a few different overloads which you can find here:

I used the c-string version istream& get(char* s,  streamsize n, char delim). This allows you to give cin a custom delimiting character (in our case !) and will read characters in and store them at the given address up to streamsize. Simples.

Technically it's cheating but he did say use cin.

As for 8, getline() also has a version that allows you to specify a delimiting character:

Tuesday 29 September 2020

Chapter 17 // Exercise 6 - Principles & Practice Using C++

In this exercise I am using Visual Studio 2017 and the std_lib_facilities header provided by Stroustrup.

Chapter 17 // Exercise 6

This chapter does not say what happens when you run out of memory using new. That's called 'memory exhaustion'. Find out what happens. You have two obvious alternatives: look for documentation, or write a program with an infinite loop that allocates but never deallocates. Try both. Approximately how much memory did you manage to allocate before failing.

Fortunately, Windows happens to be a good operating system and good OS's stop your program from eating up all the ram. It got to 2GB (which is my pagefile allowance) before it crashed on a bad memory allocation.

Chapter 17 // Exercise 5 - Principles & Practice Using C++

 In this exercise I am using Visual Studio 2017 and the std_lib_facilities header provided by Stroustrup.

Chapter 17 // Exercise 5

Write a function, char* findx(const char* s, const char* x), that finds the first occurrence of the C-style string x in s.

Github: https://github.com/l-paz91/principles-practice/blob/master/Chapter%2017/Exercise%205

I'm not entirely sure what he meant by this so I interpreted it as "finds the first occurrence of the C++-style string in the C-Style string".

Also, he did not specify not to use the standard library on this one. There is already the function strstr() to do this that takes in two const char*. 


The actual definition of this function though is deep in the bowels of VS runtime string headers but it basically takes in two pointers to the start of the char arrays and then returns a pointer to the start of the occurrence. This means that if you print the pointer, it will print everything starting from that occurrence.

I mimicked this behaviour and also cast that const away (just like the standard library does).


Saturday 26 September 2020

Chapter 17 // Exercise 4 - Principles & Practice Using C++

In this exercise I am using Visual Studio 2017 and the std_lib_facilities header provided by Stroustrup.

Chapter 17 // Exercise 4

Write a function, char* strdup(const char* c), that copies a C-style string into memory it allocates on the free store. Do not use any standard library functions.

Github: https://github.com/l-paz91/principles-practice/blob/master/Chapter%2017/Exercise%204

With const pointers I find it really stupid that you can't change the object that the pointer is pointing at, but you can change what the pointer is pointing at. In this exercise, c can be changed to point at some random garbage address but god forbid you want to assign the pointer to a non-const pointer. Unreal has a problem with this because pretty much everything gets passed round as const pointers but this allows for people to change what it's pointing at and no one will be none the wiser because it says const in the argument parameters. A lot of programmers assume (and rightly so) that this means their arguments won't be modified in the function body.

We have a senior engineer who prefers us all to use const references as you cannot change the object OR change what it's pointing at and less mistakes can be made.

Also, strdup() is a deprecated std library function so I renamed it so it would compile.

Friday 25 September 2020

Chapter 17 // Exercise 1, 2, 3 - Principles & Practice Using C++

In this exercise I am using Visual Studio 2017 and the std_lib_facilities header provided by Stroustrup.

Chapter 17 // Exercise 1, 2, 3

1. What is the output format of pointer values on your implementation? Hint: don't read the documentation.
2. How many bytes are there in an int? In a double? In a bool? Do not use of sizeof except to verify your answer.
3. Write a function, void to_lower(char* s), that replaces all uppercase characters in the C-style string s with their lowercase equivalents. For example, Hello, World! becomes hello, world!. Do not use any standard library functions. A C-style string is a zero-terminated array of characters. So if you find a char with the value 0 you are at the end.

Github: https://github.com/l-paz91/principles-practice/blob/master/Chapter%2017/Exercise%203

1. Addresses are printed in capitals as "010FFA44", so in hex without the 0x prefix.
2. At least on my pc an int is 32 bits (4 bytes), a double is 64 bits (8 bytes) and a bool is 8 bits (1 byte). I'm not sure if he wanted us to verify this?

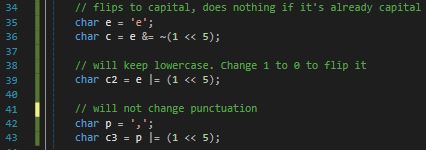
3. I used some of my assembly knowledge to do this. ASCII is very clever and well thought out. When it comes to letters, lowercase characters always have their 5th bit set to 1 and uppercase characters have it set to 0; so you can easily switch between upper and lower by just inverting bit 5.

That's what I did here:
Chapter 17 // Exercise 1, 2, 3  - Principles & Practice Using C++

On line 22, we access the contents of s, then OR bit number 5 with 1. As uppercase are 0 in bit 5, when you OR 0 with 1, you get 1, so it flips the upper character to lower.

This does not affect already lower case letters or punctuation (as 1 OR 1 is 1). Some more examples:
Chapter 17 // Exercise 1, 2, 3  - Principles & Practice Using C++
You can also use char ^= (1 << 5) to toggle the bit instead of setting it once.

A warning; s will now be pointing at the end of the array. You can also do while(s[i] != 0; ++i) to avoid this (where i is the length of the array) or assign the pointer to another pointer for the function.

Thursday 24 September 2020

Chapter 17 // Part 2 Drills - Principles & Practice Using C++

 In this exercise I am using Visual Studio 2017 and the std_lib_facilities header provided by Stroustrup.

Chapter 17 // Part 2 - Drills 

1. Allocate an int, intialise it to 7, and assign its address to a variable p1.
2. Print out the value of p1 and of the int it points to.
3. Allocate an array of seven ints ; initialise it to 1, 2, 4, 8, etc.; and assign its address to a variable p2.
4. Print out the value of p2 and of the array it points to.
5. Declare an int* called p3 and initialise it with p2.
6. Assign p1 to p2
7. Assign p3 to p2.
8. Print out the values of p1 and p2 and of what they point to.
9. Deallocate all the memory you allocated from the free store.
10. Allocate an array of ten ints; intialise it to 1, 2, 4, 8, etc.; and assign its address to a variable p1.
11. Allocate an array of ten ints, and assign its address to a variable p2.
12. Copy the values from the array pointed to by p1 into the array pointed to by p2.
13. Repeat 10-12 using a vector rather than an array.

Github: https://github.com/l-paz91/principles-practice/blob/master/Chapter%2017/AllDrillsPart2

.

Tuesday 22 September 2020

Chapter 17 // Part 1 All Drills - Principles & Practice Using C++

In this exercise I am using Visual Studio 2017 and the std_lib_facilities header provided by Stroustrup.

Chapter 17 // Part 1 - Drills 1, 2, 3, 4, 5, 6, 7, 8, 9, 10

1. Allocate an array of ten ints on the free store using new.
2. Print the values of the ten ints to cout.
3. Deallocate the array (using delete[]).
4. Write a function print_array10(ostream& os, int* a) that prints out the values of a (assumed to have ten elements) to os.
5. Allocate an array of ten ints on the free store; initialise it with the values 100, 101, 102, etc.; and print out its values.
6. Allocate an array of 11 ints on the free store; initialise it with the values 100, 101, 102, etc.; and print out its values.
7. Write a function print_array(osteam& os, int* a, int n) that prints out the values of a (assumed to have n elements) to os.
8. Allocate an array of 20 ints on the free store; initialise it with the values 100, 101, 102, etc.; and print out it's values.
9. Did you remember to delete the arrays? (If not, do it).
10. Do 5, 6, and 8 using a vector instead of an array and a  print_vector() instead of print_array().

Github: https://github.com/l-paz91/principles-practice/blob/master/Chapter%2017/AllDrillsPart1

During this exercise I learnt that vectors will not always store elements in memory next to each other.

Sunday 20 September 2020

Chapter 16 // Exercise 10 - Principles & Practice Using C++

In this exercise I am using Visual Studio 2017 and modified versions of the graphics files used throughout the chapters. You can find those versions through the link below.

Chapter 16 // Exercise 10

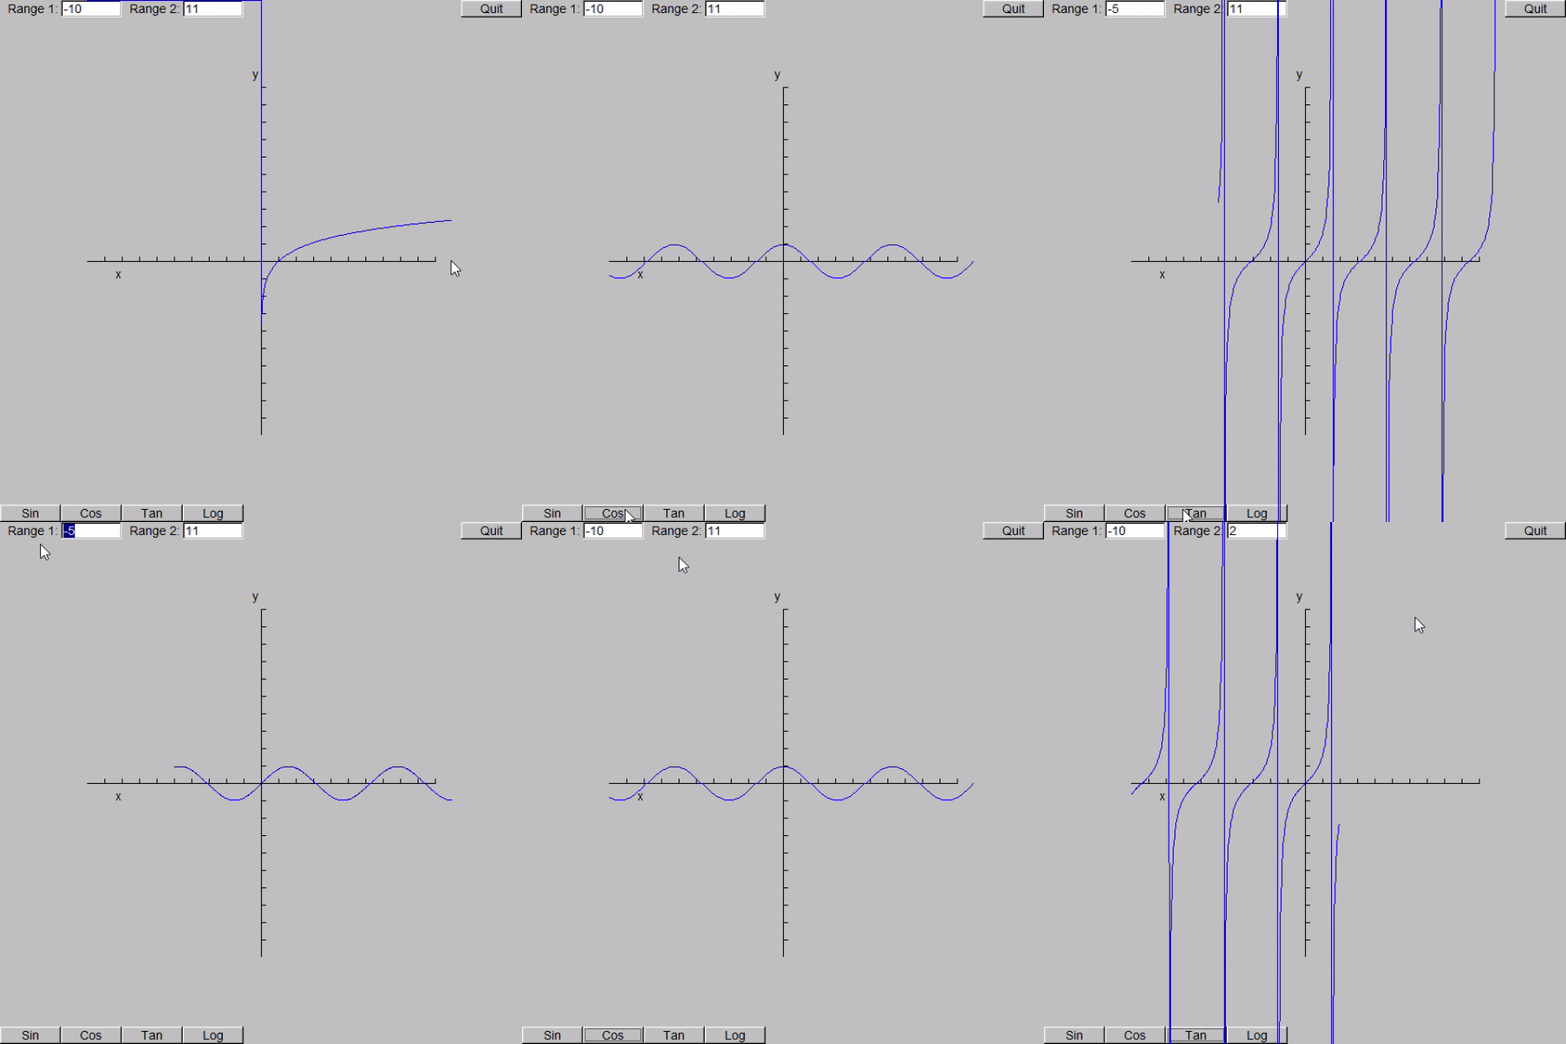
Provide a program where you can choose among a set of functions (e.g., sin() and log(), provide parameters for those functions, and then graph them.

Github: https://github.com/l-paz91/principles-practice/tree/master/Chapter%2016/Exercise%2010

It turns out In_box::get_int() will not correctly return negative numbers. This was because of the check to see if a number had been placed in the box. It checks the first character and if it's not a number it returns -99999 so I changed it to allow the first character to be '-'. Other than that, thanks to the Stored Function we made in the last chapter, this was quite straightforward. 

Chapter 16 Exercise 10 Principles & Practice Using C++

And the graphics chapters are now over :( Although I am excited to finally start working on algorithms and memory management. I use these concepts a lot at work but I feel like I haven't picked up the basics properly and I had to start running before I could even walk. I've had a look through the rest of the exercises and there are more that use FLTK so it hasn't completely disappeared. 


Friday 18 September 2020

Chapter 16 // Exercise 9 - Principles & Practice Using C++

In this exercise I am using Visual Studio 2017 and modified versions of the graphics files used throughout the chapters. You can find those versions through the link below.

Chapter 16 // Exercise 9

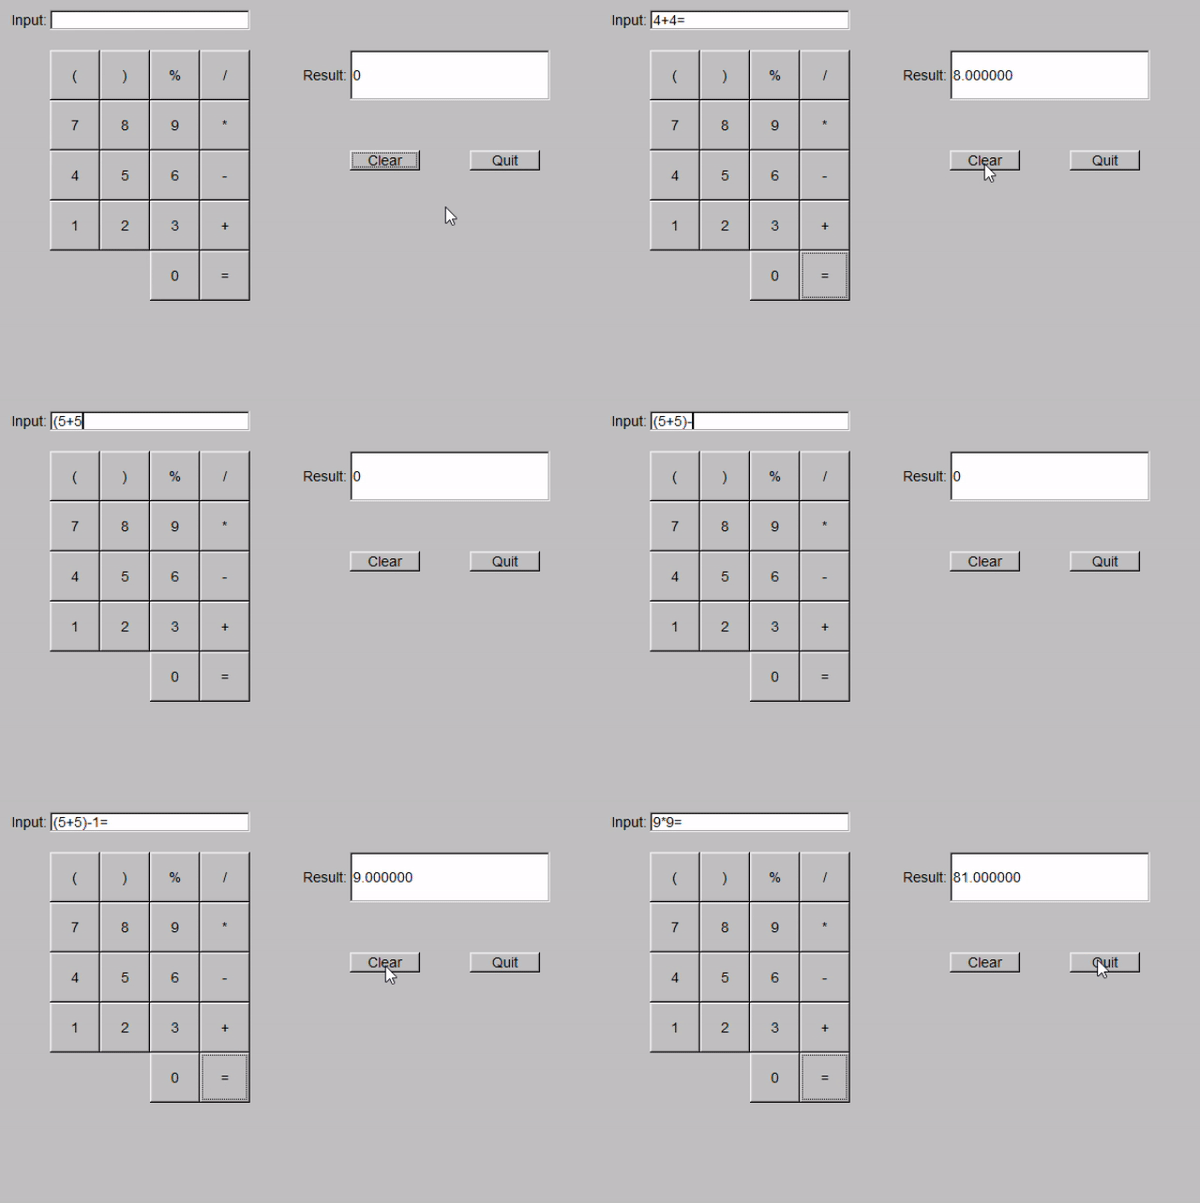
Modify the calculator from Chapter 7 to get its input from an input box and return its results in an output box.

Github: https://github.com/l-paz91/principles-practice/tree/master/Chapter%2016/Exercise%209

Oh I wish this chapter would stop haunting me. Looking at the code though reminds me of how eager I was to put in error messages. Now I just don't care.

I also wanted to avoid messing with get() and unget() as much as possible so I googled how to put a string into cin and found this very handy section of code:

This uses istringstreams and effectively "fakes" typing in the keyboard. The calculator code thinks we've typed into cin and will happily go about getting and putting back characters in cin.

I did remove a few functions and moved definitions into a cpp file (with declarations in the header) but for the most part it has stayed intact from the code uploaded here:

You can both type statements into the calculator (just don't type '=' press the button) and press the buttons:

Chapter 16 // Exercise 9 - Principles & Practice Using C++


Wednesday 16 September 2020

Chapter 16 // Exercise 8 - Principles & Practice Using C++

In this exercise I am using Visual Studio 2017 and modified versions of the graphics files used throughout the chapters. You can find those versions through the link below.

Chapter 16 // Exercise 8

Provide a currency converter. Read the conversion rates from a file on startup. Enter an amount in an input window and provide a way of selecting currencies to convert to and from (e.g., a pair of menus).

Github: https://github.com/l-paz91/principles-practice/tree/master/Chapter%2016/Exercise%208


I'm not sure how but I did it. It took me a good hour of staring at the documentation and this very helpful post from 2007:
http://www.murga-projects.com/forum/showthread.php?tid=122

My excitement though is not because I created a currency converter but, I enabled the Window class to use a jpg image as a background for the window. 

Chapter 16 Exercise 8 - Principles & Practice Using C++

In all of the previous exercises, you may have noticed that images always draw on top of widgets, no matter what order you draw in. There is a hack however, and that is to create an Fl_Box, give the box an image and then attach the box to your window. Sounds good. The problem though is that we are using Bjarne's helper classes which do not have any functionality to support this so I had to add it.

I basically made a new Widget called FakeBkg that holds an Fl_Image. attach() needs to be overridden as it's pure virtual. In here I assigned a new Fl_Box to the Fl_Widget stored in Widget, gave the widget the image stored in FakeBkg and then assigned the window with my window...I think I might do a separate post on this one.

Anyway, I added a new function to In_box to handle getting floats out of a text box and used a fixed size text file which kind of feels like cheating. I know exactly what line the conversion rates are on and how many characters in so my switch statement is extremely hard coded but efficient. Instead of reading in the text file at the beginning and storing all the different formats (which may or may not get used), it gets the rate from the file when needed.

Monday 14 September 2020

Chapter 16 // Exercise 7 - Principles & Practice Using C++

In this exercise I am using Visual Studio 2017 and modified versions of the graphics files used throughout the chapters. You can find those versions through the link below.

Chapter 16 // Exercise 7

Using the techniques developed in the previous, make an image of an airplane "fly around" in a window. Have a "Start" and a "Stop" button.

Github: https://github.com/l-paz91/principles-practice/tree/master/Chapter%2016/Exercise%207


As I learnt in the last exercise; FLTK does not directly support rotating images (it is something that you need to implement yourself and well... I can't be bothered). So, this is a very "basic" implementation of just moving a png image round the window.

FLTK does support image mirroring however it's when using its Direct Draw functions which we're not using. So, I have two images and the images are switched out when at certain angles for added "realism". Disgustingly hacky but there you go. Stopping and starting the plane is quite simple. I just moved adding the timeout to start and then removing it on stop.

Chapter 16 // Exercise 7 - Principles & Practice Using C++


I used an ellipse for the "track" as it has the useful functions getPointDirection() and getPointOnEllipse(). Ellipse could easily be switched out for a super ellipse though and given random values for the plane to follow random tracks. 

I take all the captures using the windows game bar, it seems to add blips for some reason. The program runs smoothly though.


Sunday 13 September 2020

Chapter 16 // Exercise 6 - Principles & Practice Using C++

In this exercise I am using Visual Studio 2017 and modified versions of the graphics files used throughout the chapters. You can find those versions through the link below.

Chapter 16 // Exercise 6

Make an "analog clock," that is, a clock with hands that move. You get the time of day from the operating system through a library call. A major part of this exercise is to find the functions that give you the time of day and a way of waiting for a short period of time(e.g., a second for a clock tick) and learn to use them based on the documentation you found. Hint: clock(), sleep().

Github: https://github.com/l-paz91/principles-practice/tree/master/Chapter%2016/Exercise%206


The most annoying thing about this exercise was learning that FLTK doesn't support rotating images. There is a way to implement it yourself but it involves getting all the pixel data and shifting it yourself to the new location and I can't be bothered. So I ended up just using some arrows which don't look great but they do the job.

Next I implemented the clock moving. It has three hands; one for hours, minutes and seconds. They use the C struct tm* which handily contains the current date in nice formats. AnimatedClock is its own shape and pretty much handles itself. ClockWindow has a member variable of type AnimatedClock and then ticks every second. In the gif, my PC clock was at 13:38 when I started the recording:


Originally I was trying to use Sleep(), which is a function specific to Windows that pauses the program for a given amout of milliseconds. This did not work how I wanted it to. FLTK has it's own built in timer system called Fl::Wait, we've already used it a few times before. I had a look at the documentation to see if there was a version of wait that takes in a "time value" and there is:
https://www.fltk.org/doc-1.4/classFl.html#af49654e35a0b636aa751dce5ff88a7f5

Here it mentions idle callbacks (i.e our button presses) and elapsed timeouts. I had another look round the documentation for what this meant and  found this:
https://www.fltk.org/doc-1.3/classFl.html#a23e63eb7cec3a27fa360e66c6e2b2e52

The two functions we are interested in are Fl::add_timeout and Fl::repeat_timeout. Using these are somewhat similar to registering tick functions in UE4 (the concept is essentially the same).

Fl::add_timeout requires 3 arguments; a time in seconds, a callback function and a reference to the object. So first, we register the new timeout in the constructor of our window:
(void*)this is very important otherwise on the next tick, fltk will not know what object you are referring to and you will most likely get a runtime error saying you are trying to access a nullptr.

We now create the call back function:
As standard we cast the given address to our window type and call the function we want calling when our timer elapses. The next line calls Fl::repeat_timeout, this is because Fl::add_timout is a oneshot and as such it will only be called once so we tell fltk to repeat the timeout every given time. This is useful because you might want it initially to go off for 1 second but then check every 10. We give it the callback function and use addr to specify our object. addr contains the address of this (our window) which we passed in in the constructor.

Thursday 10 September 2020

Chapter 16 // Exercise 5 - Principles & Practice Using C++

In this exercise I am using Visual Studio 2017 and modified versions of the graphics files used throughout the chapters. You can find those versions through the link below.

Chapter 16 // Exercise 5

Write a program that draws a shape of your choice and moves it to a new point each time you click "Next". The new point should be determined by a co-ordinate pair read from an input stream.

Github: https://github.com/l-paz91/principles-practice/tree/master/Chapter%2016/Exercise%205


Another straightforward one. I added a next button & action function to the window created in the previous exercise and had it draw a randomly sized/shaped/coloured star. If no co-ordinates are given, it chooses a random one. In In_box::get_int(), it always returns -999999 if no number is given so I plugged that in as no number given.


Chapter 16 // Exercise 5 - Principles & Practice Using C++

Wednesday 9 September 2020

Chapter 16 // Exercise 4 - Principles & Practice Using C++

In this exercise I am using Visual Studio 2017 and modified versions of the graphics files used throughout the chapters. You can find those versions through the link below.

Chapter 16 // Exercise 4

Make a menu with items that make a circle, a square, an equilateral triangle, and a hexagon, respectively. Make an input box (or two) for giving a coordinate pair, and place the shape made by pressing a menu item at that coordinate. Sorry, no drag and drop.

Github: https://github.com/l-paz91/principles-practice/tree/master/Chapter%2016/Exercise%204


This was tricky because the window constantly calls draw() which appears to be causing problems. When you add a new shape to the window it seems to overwrite the previous one with garbage, causing problems when it comes to redraw the scene.

For some strange reason, I had to make everything a pointer in order for it to work properly. I'm not quite sure why but I have a hunch. Even though I was pushing back instances of Shapes into a vector stored in the window; the previous shapes were going out of scope when redraw() was called. This would explain why the vector suddenly becomes filled with garbage. It knows a Shape used to be there but it doesn't know what. To get round this, I new-ed the shapes up and pushed them into a vector of Shape pointers. This ensures that the shapes cannot go out of scope.

Once again I had one function that handled the button press and used an enum to tell the function what shape to draw.


Chapter 16 // Exercise 4 - Principles & Practice Using C++


Tuesday 8 September 2020

Chapter 16 // Exercise 3 - Principles & Practice Using C++

In this exercise I am using Visual Studio 2017 and modified versions of the graphics files used throughout the chapters. You can find those versions through the link below.

Chapter 16 // Exercise 3

Place an Image  on top of a Button; move both when the button is pushed. Use this random number generator from std_lib_facilities.h to pick a new location for the "image button":

#include <random>

inline int randint(int min, int max)
{
    static default_random_engine ran;
    return uniform_int_distribution<>{min, max}(ran);
}

Github: https://github.com/l-paz91/principles-practice/tree/master/Chapter%2016/Exercise%203


This one was quite straightforward. I'm a little surprised at just how easy it is to get movable buttons up and running using fltk, it's a bit of a nightmare in DirectX. I modified My_window slightly to have another button and an image and changed the move() function in widget so it actually moves it to a new location instead of adding the new location to the current one.


Chapter 16 // Exercise 3 - Principles & Practice Using C++

Monday 7 September 2020

Chapter 16 // Exercise 2 - Principles & Practice Using C++

In this exercise I am using Visual Studio 2017 and modified versions of the graphics files used throughout the chapters. You can find those versions through the link below.

Chapter 16 // Exercise 2

Make a window (based on My_window) with a 4-by-4 checkerboard of square buttons. When pressed, a button performs a simple action, such as printing its coordinates in an output box, or turns a slightly different colour (until another button is pressed).

Github: https://github.com/l-paz91/principles-practice/tree/master/Chapter%2016/Exercise%202


The main problem with this exercise is that I learnt that you cannot use a lambda as a callback function if it is capturing local variables. I managed to get rid of all the call back functions and have only 1 button action function but because of this constraint, I still had to have 16 separate push_backs in the constructor for CheckerboardWindow instead of being able to use a for loop.

I added a couple of new values to the Colour_type enum in Graph.h as well which gives us the exact background colour (handily called FL_BACKGROUND_COLOR by fltk). 

There was something oddly satsifying about this exercise though...maybe I can finally make Minesweeper live and reloaded now...


Chapter 16 // Exercise 2 - Principles & Practice Using C++

Wednesday 2 September 2020

Chapter 16 // Exercise 1 - Principles & Practice Using C++

In this exercise I am using Visual Studio 2017 and modified versions of the graphics files used throughout the chapters. You can find those versions through the link below.

Chapter 16 // Exercise 1

Make a My_window that's a bit like Simple_window except that it has two buttons, next and quit.

Github: https://github.com/l-paz91/principles-practice/tree/master/Chapter%2016/Exercise%201

I could've easily just inherited Simple_window and added another button to it but I wanted to practice making a window so created it in a new file.

My_window doesn't work exactly like Simple_window and needs return gui_main() to work properly (unlike Simple_window) but I like it.

Chapter 16 // Exercise 1 - Principles & Practice Using C++

The green square appears after next is pressed.

Tuesday 1 September 2020

Chapter 16 // Drills 1, 2, 3, 4 - Principles & Practice Using C++

In this exercise I am using Visual Studio 2017 and modified versions of the graphics files used throughout the chapters. You can find those versions through the link below.

Chapter 16 // Drills 1, 2, 3, 4

1. Make a completely new project with linker settings for FLTK (as described in Appendix D).
2. Using the facilities of Graph_lib, type in the line-drawing program from section 16.5 and get it to run.
3. Modify the program to use a pop-up menu as described in section 16.7 and get it to run.
4. Modify the program to have a second menu for choosing line styles and get it to run.

Github: https://github.com/l-paz91/principles-practice/tree/master/Chapter%2016/Drills

I didn't do 1 as I've been using the same project since the start of chapter 12 because I'm lazy.


The second one made me scratch my head a few times. I initially set it up in Graph.h but it didn't like that. So I moved it to Simple_window.h...visual studio also didn't like that. It didn't like it in Window.h either. Eventually, because I'm big brain, I realised I was creating circular dependencies due to certain headers that needed to be included so Lines_window is in GUI.h. Also, because Window is a class and not a struct, make sure you put : public Window when inheriting....

3 is pretty simple as long as you follow the code in the book however you need to add hideMenu() and redraw() to the change() function otherwise the menu won't close itself after you've selected a new colour.

Once 3 was working, 4 was as simple as copypasta and change some code. I decided not to implement callback functions and use lambdas as I hate them and I need to get more comfortable using them..even if I think the callback functions are more readable. Unreal Engine fucking loves lambdas. I made the change line style function take in a line style so I didn't have to create a function for every different line style.


I'm happy to have finally started this chapter though; I'm going to create some sick 1998-looking programs now.