Thursday, 26 August 2021

Chapter 20 // Exercise 8 - Principles & Practice Using C++

In this exercise I am using Visual Studio 2019 and a modified version of the std_lib_facilities header found here.

Chapter 20 // Exercise 8

Define a function that counts the number of characters in a Document.


This one was pretty simple. Instead of iterating through every character in the document, I just added up the sizes of the vectors in the list that makes up a document.

Tuesday, 17 August 2021

Chapter 20 // Exercise 7 - Principles & Practice Using C++

In this exercise I am using Visual Studio 2019 and a modified version of the std_lib_facilities header found here.

Chapter 20 // Exercise 7

Find the lexicographical last string in an unsorted vector<string>.


This exercise is a "gotcha". Lexicographical order is basically alphabetical order but to computers, uppercase is alphabetically before lowercase so Zebra would come before zany when it should be after.

Since Bjarne goes on about the std library in this chapter I had a poke round the library to see what functions I could use:
  • string::compare() does not compare lexicographically.
  • strcmp() does not compare lexicographically.
  • std::lexicographical_compare() ironically does not compare lexicographically but there is another version that takes a predicate.
Creating a function to do this though was an exercise in Chapter 18 (exercise 3). I'll need to go back and edit that as I didn't stop to think about uppercase and lowercase characters. Bjarne you devious snake.

So instead I created a simple predicate function that you can pass to lexicographical_compare that returns if tolower(char 1) < tolower(char 2). This solves the problem.


Monday, 16 August 2021

Chapter 20 // Exercise 6 - Principles & Practice Using C++

In this exercise I am using Visual Studio 2019 and a modified version of the std_lib_facilities header found here.

Chapter 20 // Exercise 6

Write a find-and-replace operation for Documents based on section 20.6.2


It's been so long since I read this chapter I forgot about the second half and had to re-read it.

Then I did some unreal stuff for a month, forgot again and had to re-read it again...

To say I procrastinated is an understatement. This exercise involves getting the code from section 20.6.2 to run. This means you need to write the match() function on page 740. Once you've done that you're halfway there as you have a way to find a word. 

Match() is trivial. Since we have a string and iterators to the start and end of the document, we just loop through the string checking if the contents of the iterator matches each character, advancing the iterator each time round. If we get to the end of the string without returning false, we've found a match.

So that takes care of "find". To "replace", I got a reference to the vector of characters (the line) from the iterator. Worked out at what index the iterator was at by using this:

Then erased the characters from the vector and inserted the new ones.

So that was my first iteration of FindAndReplace(). It's great for finding and replacing individual words and sentences but not sequences of letters that can't be considered words like the example he gives in the chapter (ones containing special characters like secret\nhomestead). This one is a bit trickier. Let's say I have the lines:
"This is a line ending with a secret"
"homestead is a word."
We can return an iterator to point at the start of secret as finding the string "secret\nhomestead" is easy using match(). However, how would the text editor replace this? Remove secret, replace it with the word and remove homestead. Or remove secret and replace homestead with the word. Or even merging the two lines together with the replacement word? 

I decided to go with the last one and merge the lines together; deleting any lines as necessary.

One thing I haven't allowed is the replacement string to insert new lines. So if you want to replace "banana" with "banana\napple" it won't insert a new line. But cout will make it look like a new line has been inserted. I may do that later. 

Chapter 20 // Exercise 6 - Principles & Practice Using C++

Chapter 20 // Exercise 6 - Principles & Practice Using C++

Chapter 20 // Exercise 6 - Principles & Practice Using C++

EDIT 30/06/2023
Whilst doing Chapter 26 - Exercise 7. It asks to create tests for this code. So I got the code off github and found it no longer compiles. I'm guessing they've updated iterator standards over the past few years and it now requires you to have certain features defined. Either way std::find() would no longer work for the iterator class as defined in the book, so I re-wrote the find_text to not use std::find(). You can find that code here:

Saturday, 31 July 2021

UE4 // Book Generator Project

I took a break from C++ programming to focus on something I don't have much experience with; the Unreal Editor. I use Unreal everyday for work but I usually don't open the editor and if I do it's just to test something I've written/modified in C++. I'm not a designer or a gameplay programmer so it's not something I use often.

I decided to come up with a small project that I could easily break down into stages and implement. I like horror games and most horror games tend to have a library in the level. Creating a book and then placing hundreds of them is tedious and a waste of time so I thought a book/library generator would be a nice small and encapsulated project.

After some planning I ended up with 7 stages that started from creating and uv-unwrapping a simple book model to creating a bookshelf blueprint that has books randomly placed when dragged out:

UE4 // Book Generator Project

You can drag out this cube and it has 4 different spawn points on it that will randomly spawn, horizontal or vertical stacks of books. They themselves are also randomly spawned.

Stage 1 - Book Creation
I had 4 tasks for this stage; 
  1. Create a simple book mesh
  2. UV unwrap it
  3. Create a texture for it
  4. Import it into unreal

I had to re-import it a few times as I kept changing where I wanted the pivot to be and blender's UV map exporter is slightly annoying. My book textures are off by 1 pixel in certain places as Blender can't make up it's mind about hard edges in UV maps.

To create the textures I used a combination of Adobe PhotoShop and an online tool of theirs called Adobe Spark. Spark is fantastic for quickly creating social media graphics as it comes with thousands of templates, free images and fonts. Or well, it's free if you have a CC license (which I do).

UE4 // Book Generator Project

The book dimensions are based off a real book off my shelf and the side textures were created by taking a photo of the sides.

Stage 2 - More Textures and a Book Blueprint
This stages tasks:
  1. Create 9 more textures for the book
  2. Create a way to swap the texture via the editor using a drop down menu
  3. When the book is dragged into the editor it will pick a random texture
  4. When the book is dragged into the editor it will pick a random scale.
Creating all the textures took me 11 days and by the end I was a bit sick of texturing.

UE4 // Book Generator Project

For the next tasks, I became acquaintances with the construction script. Basically, the construction script is run anytime the actor is built and actors are rebuilt on many things:
  • Compilation
  • Save
  • Editor Opening
  • Moving/rotating/scaling the actor
  • Changing a variable on the actor
  • Cooking (building the game for shipping)
It's extremely powerful and useful but also very dangerous. For this I created an enum out of my book covers and then created a random number on construction and used that to determine the book cover. I made these variables public so the cover can be picked manually or set to random by the user in the details panel. I did the same for the scale but only allowed a scale between 0.5 and 1 (1 being full size).

UE4 // Book Generator Project

This is pretty comprehensive for a single book but set the foundation for later stages. "Freezing" the settings is a bit complicated as when construction is run, the actor is torn down and rebuilt so any variables on it are set back to default (or whatever they are set to in the details panel). To counteract this I used something called "Random Streams". This way the book is given the exact same seed when FreezeSettings is true, and then when it's rebuilt it will "randomly" choose the exact same random numbers used to set the cover/scale again. When FreezeSettings is false, a new seed is supplied changing the random numbers starting point.

Stage 3 - Horizontal Stacks
The tasks:
  1. Create a book actor that is a horizontal stack of books. Allow users to add/remove books to the stack
  2. Give the books random scales
This was the hardest stage for me. I started this project on the 10th April and only finished Stage 3 on the 25th July. I had work and other things but I was severely blocked on the stack of books having a random scale applied. I calculate where to place the next book based on the depth of each book added together. This works perfectly, however I was doing this in one place in the construction script:

UE4 // Book Generator Project

Yep. I was giving the book a random scale then setting the global bookscale variable with another random scale. I was livid with myself that I made such a stupid mistake. After this progress was much faster and you can bet I triple checked all my blueprint nodes going forward. 

UE4 // Book Generator Project

For this you can just drag in instances of BP_HorizontalStack, freeze the settings, unfreeze, set random scales and alt-drag new instances to create stacks of books in seconds.

To increase/decrease the books I set a public slider in the details and then in the construction used a for loop. When the slider changed, it would call to "Add Book", setting the cover/location/scale for the number of books set by the slider. Thanks to the random stream, when frozen, it appeared as though all the settings of the book had been saved when in reality they hadn't.

Stage 4 - Vertical Stacks
The tasks:
  1. Create a book actor that is a vertical stack of books. Allow users to add/remove books to the stack.
  2. Allow users to align the books left, right and center.
  3. Allow random scales.
  4. Allow random rotations.
  5. "Flip" book so the spine is facing the other way.
The first task didn't take long. I just simple set the rotation of the book to -90 degrees when spawned. This caused all the books to be stacked on top of each other. However they are all very neat with a default right alignment thanks to where the pivot point is. 

To calculate the offsets so they could be aligned differently, I just offset the spawned location on X and Y using 25% of the books length. 

For random rotations I created a random float in the ranges of -90 to 90 degrees on the z angle using a random stream. Again the stream allowed the rotations to be "frozen".

UE4 // Book Generator Project

Stage 5 - Stack Extras
The tasks:
  1. "Flipped" books so the spines are facing the other way.
  2. Rotating some of the books in horizontal stacks
Flipping the books was a bit of head scratcher for me as I realised it was flipping the book at the pivot point so doing a simple rotation wouldn't work. I then remembered that negating the scale of a mesh causes the texture to "flip" without actually changing the scale. Granted the text is backwards if you see it but these books are only, at most, 20cm tall and meant as background decoration so this worked perfectly.

UE4 // Book Generator Project

The next task frustrated me for an evening until maths came to my rescue. The next book spawn location is determined by all the book widths added together but how wide is a book when it's rotated slightly? As I drew out the problem on paper I quickly noticed that it created a right-angled triangle where I knew the hypotenuse and theta so I had to use Pythagoras to determine the adjacent (the side of the triangle I was after). I then added that length to my stack length and now it creates randomly rotated books (from angles 0 - 20 degrees) of varying scale:

UE4 // Book Generator Project

It's not completely perfect and the end book can end up being rotated as I haven't set anything in place for that but you can just randomise it again. The book rotations are on weighted bools (from streams again, any random numbers use streams) so there's only a 0.05% chance of them being rotated. To rotate them the other way, once the length has been determined, I just move the x location of the book to the end point and negate the angle.


Stage 6 - Bookshelves
The task:
  1. Create 2 simple bookshelves to place books on.
For one of the bookshelves I went back to blender and used the exact dimensions of an Ikea Kallax Cube:
UE4 // Book Generator Project

I UV-unwrapped it and created material slots so I could just apply a simple wood material from the UE4 starter content.

For the other bookshelf, I placed a load of cubes in the editor, scaled/rotated them and then converted them to a Blueprint:

UE4 // Book Generator Project

This isn't as perfect as creating the mesh in blender as the sides are warped but it's good enough and not that noticeable when playing in game.

UE4 // Book Generator Project

Stage 7 - Bookshelf Blueprint
The task:
  1. Create a bookshelf that when dragged into the editor has books randomly spawn on it.
I ended up doing this task in 40 minutes as I already had all the other blueprints. I simply created a few "spawn points" on the mesh and then called "Add Child Actor Component" in the construction script. These calls were behind random weighted bools so not all spawn points are always used.

UE4 // Book Generator Project

And that's it! There are so many more things I want to do and feature creep is rearing it's ugly head but I set out to do specific things; I accomplished that and now it's time to go back to C++ land.

I really enjoyed this task; more so as I got used to blueprint. I remember doing beginner tutorials and wondering how on earth you were supposed to remember all the nodes. The truth it you don't; it's like normal programming only you don't know the language so you search for the appropriate node/google it until you get used to it. Blueprint is super fast for iterating through designs and I rather enjoyed not having to build the editor and open it every time I made a "code" change.

Future tasks do include though:
  1. Allowing the blueprints to be cooked out to merged static meshes to reduce draw calls
  2. Re-doing everything in C++/Blueprint (I do some heavy maths in blueprint and it hurts my soul)

Monday, 14 June 2021

Automated Testing // Adding Google Tests to a C++ Visual Studio Project and How to Use Them

It's starting to get to the point in my exercises for Principles and Practice, that I'm missing important things out because I'm not testing my code properly. This is because 1) I'm lazy, and 2) I'm lazy. At work, we use a variety of unit tests, map tests, asset audits and other things to try and catch code that could break the build if submitted. Granted, some things get through; there will always be edge cases. But for the most part; automated tests can save you a lot of time and sanity.

Creating a Google Test Project

First create a new project using the google framework. I'm using Visual Studio 2019 which has Google Test already integrated. Earlier versions may need it installing via the VS Installer.
Give it a name.

On the next screen you can choose to dynamically link or statically link. I left it on the defaults but you can read about why you might want to change here: https://docs.microsoft.com/en-us/cpp/build/dlls-in-visual-cpp?view=msvc-160


Once your project has opened, you may notice there is no main(). Unit tests don't need a main. You can even link this project to your current one and then import the files you want to test but that's getting ahead. Simply build the project; it should build with no errors. Then open up the test explorer found in View->Test Explorer. I like to dock it to the side where the solution explorer is and you can easily tab between the two.


You need to build it for new tests to show up there. Here it's showing the test "TestName". This simple test expects 1 to be equal to 1 and expects true to be true; difficult stuff. If you run the test by pressing the green arrow in the test explorer you can see that it turns green with a tick as 1 is indeed equal to 1 and true is true.


Let's change this up a bit. I'll make a new test. Here I've added a function that adds numbers together. I'm testing that it works correctly by expecting the appropriate answer. 

I suggest making some simple tests in this project to get used to the different macros within google test. You can read more about those here:
Google actually has some excellent documentation.

Adding Google Test to Your Current Project

Right click on the solution name of the project you're working in. Choose Solution->Add->New Project.

Here scroll down and choose Google Tests. Hit next. Give the project a name and a location. When you hit next this box will appear:

Now you can choose a project to test from the drop down box (very handy).  The best part about choosing the project is that your test project will automagically reference the chosen project; no need to mess about doing it manually.

Your solution explorer will now look something like this:

Now I want to test my code. Currently I'm creating vectors of different types and entering data in the console window whilst the program is running to test different input. But what if I could do this with tests?

To get hold of my header file with the functions I want to test, I'm going to add the solution directory to the test solution. Right click on the Test solution and choose properties.

In here go to C/C++ -> General -> Additional Include Directories -> Edit


Click the folder icon. 3 dots will appear below; click them and navigate to the folder where your project is. Hit ok, then apply and ok again.


Now you should be able to include files from your project without having to give the full directory.

Using Google Test

As an example, I had an exercise to provide input and output operators to std::vector. When I put the code up, I would like others to see the types of tests I've done so they to can try those tests and hopefully it should also make the code easier to understand. Here I want to test that strings with whitespace are correctly read in as one variable instead as pushed back as multiple. I've created 3 test strings and read them into the vector. This should produce 3 entries in the vector:


I then ran the test in the test explorer and it failed with this extremely handy output:

I don't need to do any debugging in the console window now as I clearly know that my input overload function is not reading strings with whitespace as one variable.

Looking at that code I can see why:

It will read into a variable and then push that variable back so long as the stream isn't bad. I can change this now to read into the variable using getline() and use stringstream to convert the string into the correct type. There is another problem though; as this is templated I can't directly convert the stringstream into a string (it will just put 1 word into the variable if I do stringstream >> variable). So I added another overloaded function for string types.


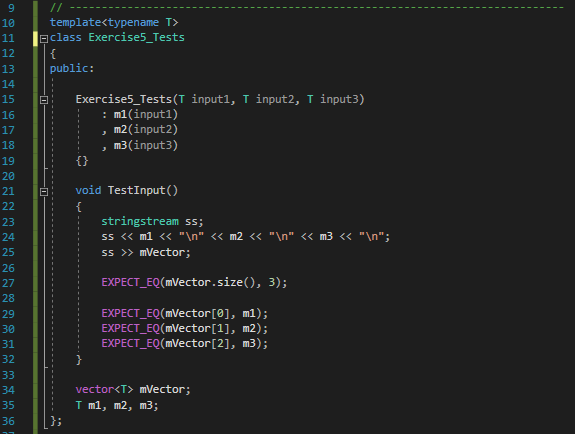
There are lots of other tests I could write for this scenario; ones for integers, ones for chars and floats. All those tests will get repetitive though so you could create a templated test and run those instead. This is quite simple. I just templated my original test and gave it some inputs via the constructor: 

Then created new tests with the different types and input:


This can be streamlined even further with Type Paramatized Tests. These are great for flagging any errors you might get from using a specific type with your code. Setting up a type paramatized test is a faff but it pretty much looks like this:


(Line 40) First, create a fixture class that derives from testing::Test. I left mine empty because I wanted to continue using Exercise5_Tests<> in my tests instead, but you need this base class to define the parametized tests.

(Line 47) You then need to declare that you are creating a type parametized tests suit using a class template.

(Line 49 - 56) Then you define your test. It can be repeated as many times as you want. I only have 1; InputIsCorrect, but you can add another. Just make sure the first parameter matches the name of you base class for this test suite. I added some code as an example.

(Line 58) The tests now need to be registered. You don't need a call to this macro for each test name. If you have more than 1 test you can register them like so:
REGISTER_TYPED_TEST_CASE_P(VectorInputTests, InputIsCorrect, AnotherTest, AThirdTest)

(Line 60 - 61) Let the test suite know what types to run the test with. I supplied int, float and double. So Google test will create 3 versions of InputIsCorrect, replacing TypeParam with one of these types.

My tests are extremely basic and not really worth it but they're useful for learning about google tests and getting used to writing them. One of the hardest parts of my job is not actually writing/creating features but it's testing them. In production code, type parametized tests could catch errors if someone decides to create a templated type with a type it's not supposed to be. Of course that does rely on the user adding that type to the tests....this is where testing fails us sometimes.

A more useful example would be a type of AI in a video game. The AI could all be fundamentally different; a zombie, an NPC or a dog but let's pretend they all inherit an interface that allows them to calculate the players position and move towards them. Instead of writing individual tests for each type, you write one test, call the necessary function (it could be MoveTowardsPlayer()) and observe the output.

// Debugging

If you have written a test and you're not sure why it's failing, you can debug through the test which is extremely useful. Place your breakpoints then right click on the test name in the explorer and choose debug instead of run. It saves a lot of time giving your code what it needs to run instead of having to manually get it into the failing state.

Sometimes this might happen:

I find that building hangs for some reason. I just clean the solution and build again and that usually fixes it.

// Final Comments

Make sure to read the the docs:

They're actually useful. I'd say Google Tests is similar but different enough to the unit tests we use at work but after an evening of tinkering I found the test suite very easy to use. Engines like Unreal have there own testing framework built in; that's the one we use (albeit it's been modified). You can read more about UE4's testing suite here:

And last, here's a great talk from one of our engineers about testing and why you should use it:
Happy testing!

Here's a link to the full test file: