https://github.com/l-paz91/principles-practice/tree/master/Graphics%20Files
Chapter 14 // Exercise 6
Define a Striped_circle using the technique from Striped_rectangle.
Github: https://github.com/l-paz91/principles-practice/tree/master/Chapter%2014/Exercise%206
This one took me a while to solve as maths is not my strong point. I went through quite a few different methods (that didn't work). The main trouble for me is trying to find the correct formulas I need when I don't actually know the technical name for what I'm doing.
I knew the radius of the circle and the y co-ordinate of the line to draw; the x co-ord was missing. It took me a while to successfully google what I was looking for. This video was extremely helpful:
https://www.youtube.com/watch?v=egtrsPZ7THQ
We can solve for x by re-arranging the equation of a circle or using Pythagoras. Both need the use of sqrt() to solve. I decided to use pythag as it's nicer to look at.
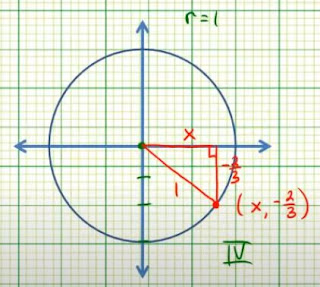
Here is a snippet of the video to help visualise what has happened:
For a particular circle lets say the center is {200,200} and the radius is 100. The stripe width is 10. That means we know the length of the Y side is 10 and the length of the R side is 100. We need to find the length of the X side. Pythag is:
a² + b² = c² or in our case x² + y² = r²
Solved for x gives:
x² = r² - y²
You can then just square root X to get the length. When using fl_line() to draw the line, the length of the stripe is as simple as (centerX - X, Y) and (centerX + X, Y). Utilising some for loops; different sized stripes can be used to fill the circle.


No comments:
Post a Comment