Friday, 26 February 2021

C++ & FLTK // Adding Simple "Sprite" Support

This isn't really a tutorial, more of a "hey, I wanted to add 'sprites' to my FLTK build, how would I do that?"

For those of you new to my blog, I've been working my way through Bjarne Stroustrup's Practice & Principles using C++ in which there are several chapters focused on graphics programming. For this he supplies a couple of helper files that wrap some fltk features in a "higher level bow" so to speak. Over the months I've been editing these quite a bit to create my own shapes and add other functionality.

After these graphics chapters ended, I started to wonder if I could make a 2d engine using fltk and what does every good 2d engine need? Sprite support.

After an hour of tinkering, I had achieved this:

C++ & FLTK - Adding "Sprite" Support

Very exciting. I'd like to note, this did not capture well and it kind of looks like there's a slight stall after a few frames but when running the program it's fine.

So I first went about this by creating a new simple window that supports "ticking". It has a quit button and a tick function that's registered with fltk's callback system to run every 0.1 seconds.

Then I made a new class called Sprite which inherits from the Shape class. I soon learnt that Shape is great for basic stuff, but when you want to start doing event based game stuff, the way shapes are drawn and updated is kind of clunky so I need to re-do shapes. But for now I worked round it.

So a Sprite takes in a point to draw from the top left-hand corner, a file name, frame width, frame height and the number of rows in the spritesheet; kind of reaching for the moment as it can't deal with sprites with multiple rows just yet.

The Sprite itself is just an Fl_Image that holds the png "spritesheet". This was mine:

C++ & FLTK - Adding "Sprite" Support

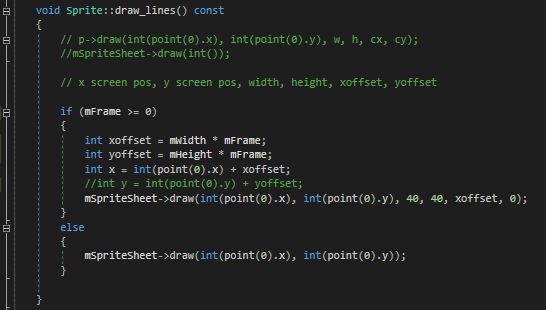
It's the coin blocks from Super Mario World. When attaching this image to the window, obviously the entire image was displayed. Sprites should be able to only display a certain portion or 'frame' of their spritesheet, so I made a function called drawFrame() that takes in a frame number. This frame number is stored and used in draw_lines() to display a particular part of the image. This is the annoying part of using a Shape; I must override draw_lines() and use that to draw. 

To only display a certain part of the image, you can just use built-in functionality of Fl_Image. The draw() function allows you to specify a part of the image to draw by passing in the top left corner locations and an offset. This essentially "crops" the image to the size given. The width and height is then multiplied by the frame number each frame to advance it to the next image:
C++ & FLTK - Adding "Sprite" Support

C++ & FLTK - Adding "Sprite" Support

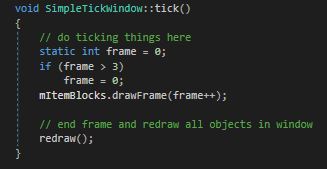
Here, my spritesheet is 200x400 pixels with each block being 40x40. Therefore, to play an animation, fltk is told to start at frame 0 and increase by 1 each frame until it hits 3, then go back to 0. This stops it from showing the brown block, which is frame number 4.

So to show the second image block, it would do 40 * 1, which is 40. This gives an x offset of 40. Then the x and y coordinates of the new cropped image are obtained by getting the top left of the full sprite sheet (I set it to 50, 50) then adding on the offset; making the new draw point 90, 50. The draw() function is handy though as it can display the cropped image in the same position as the last through the first two parameters. The Y offset is ignored right now as we don't have multiple rows.

It's also important that post increment is used here. I usually detest using post++, however here it is necessary as the current frame needs to be drawn before it's incremented. If it was ++frame, then the next frame would be drawn as it's incremented before use.

And that's pretty much it for creating the most basic of basic sprite systems for FLTK. I have plans to rewrite the shape class so I have full control over how they're drawn.

You can find the full code for this project here along with a project file:

Wednesday, 24 February 2021

Ray Tracing in One Weekend Review

I've now finished this web book; admittedly it took me a little longer than 1 weekend due to chores and other things getting in the way but it's definitely doable in one weekend.

It basically teaches you how to brute force your way to creating a ray tracer using C++ and a lot of scary looking maths equations. With that said, it's basically an exercise in copying code correctly as there isn't much interaction with the concepts taught. That is left up to you at the end of the book.

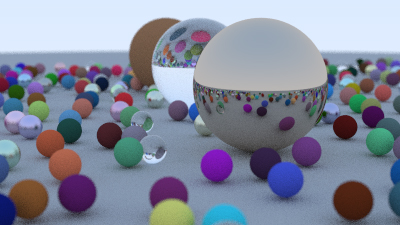
Instead you will go through creating materials, cameras and various methods like calculating reflections that can be used in whatever your mind cooks up. You will have this scene by the end of it though:

Ray Tracing in One Weekend Review

That is the final image size for me; it's 400x225 with a paltry 100 samples per pixels and it took a whopping 27 minutes to render. This is where you can do some self-learning and improve the code. I've already tasked myself with parallelising the pixel calculations as currently the program only uses 1 core and 1 thread to do all the work.  I have an i7-4790k which has 4 cores (and therefore 8 threads). I could use the standard C++ library to spin up as many threads as possible across all cores and get the render done much faster.

I have very little experience with multi-threading so this seems like a nice way to ease myself into the subject. After that, I'd like to create some more material types and perhaps even make the render interactive by being able to move the camera? I would have to turn the the samples per pixel down to about 15 but I think it would be doable. I think this would be similar to how Blender displays objects when you switch to the cycles renderer.

I think if you are an absolute beginner into graphics or general programming this will go over your head. The author doesn't even mention how you create the image and assumes that you know to call a certain command in command line. For reference you navigate to the folder the exe is stored in and type: RayTracing.exe > image.ppm

This will redirect cout to the supplied format instead. I found the PPM to be a bit bulky as it's all text but allows you to spot bad pixels easily (useful when attempting to multi-thread). PhotoShop opens it fine but I had difficulty finding another program to open that format as the IrfanViewer website was blocked by my anti-virus.

All in all; worth a weekend or two of your time if you're interested in rendering, graphics and ray tracing. There are two other books to complete after this as well that go into more depth on the topic.

Thursday, 11 February 2021

Chapter 19 // Exercise 10 - Principles & Practice Using C++

In this exercise I am using Visual Studio 2017 and a modified version of the std_lib_facilities header found here.

Chapter 19 // Exercise 10

Implement a simple unique_ptr supporting only a constructor, destructor, ->, *, and release(). In particular, don't try to implement an assignment or copy constructor.


I left the crtDetectMemoryLeaks function in this one and it works for new and delete as well! Happy days. Glad I did as my first run leaked memory. I had forgotten which way round to delete in the destructor. I used to see a lot of code that would do:
delete object;
object = nullptr;

I messed it up and of course that memory was lost because I didn't stop to think. I did google to find out if it's standard practice to delete and null and the consensus is; not really as it may cover up double delete bugs. We've had problems with double deletes at work so I don't want to contribute to covering up those as they are nasty to solve.

Tuesday, 9 February 2021

Chapter 19 // Exercise 8, 9 - Principles & Practice Using C++

In this exercise I am using Visual Studio 2017 and a modified version of the std_lib_facilities header found here.

Chapter 19 // Exercise 8

Implement an allocator (section 19.3.7) using the basic allocation functions malloc() and free() (appendix B.11.4). Get vector as defined by the end of section 19.4 to work for a few simple test cases. Hint: Look up "placement new" and "explicit call of destructor" in a complete C++ reference.

Exercise 9

Re-implement vector::operator=() (section 19.2.5) using an allocator (section 19.3.7) for memory managment. (I ended up doing this one automatically as part of 8).

Github: 

I honestly had no clue on this one. It took me a couple of hours of just staring at chapter 19.

I looked up those terms in Bjarne's "The C++ Programming Language 4th ed." and he says that 'explicit calls of destructors should be avoided except in the implementation of resource management classes....However, it would be hard to implement an efficient general container along the lines of the standard-library vector without using explicit destructor calls.'

One very interesting thing I learnt during this exercise is how to detect memory leaks in visual studio when using malloc and free. After I had finished writing my class, I wanted to be absolutely positive that the allocated space was being freed properly so followed this guide to do so:

I then pushed back a few values and exited the program to be greeted with this in the output window:

Interestingly; the destructor for MyVector is not called on exiting main but it is called when MyVector is local to a function. I tested this with a std::vector and it to did not have it's destructor called at the end of main. Now I know for a fact that std::vector will clean up after itself properly so it must mean that this _CrtDumpMemoryLeaks() function dumps the output before MyVector has been destroyed. I'm happy that the class is properly allocating and freeing up memory though when it's local to other functions and I can see it being destroyed.

Then when testing I had a problem with values being destroyed when trying to print. I spent a few hours staring at my screen and eventually went to bed angry. The next day I posted my code and asked for some help in our chat channel at work and my colleagues came to the rescue. Turns out I wasn't actually destroying anything in destroy(). They taught me how to use placement new and call the destructor explicitly.

This exercises took me far longer than I expected but I learnt a ton.

Saturday, 6 February 2021

BlenderGuru's Blender Doughnut Tutorial Review (so good I did it twice!)

If you want to become an indie game developer (or a 3d artist) and you have no money for Maya or 3ds Max then Blender is your saving grace. Thank you Mr Blender creator man for making it free. 

3D modelling is a job in itself but by learning a few shortcuts and basic tools you can create game ready assets in next to no time. In order to do that though you need to learn how to use Blender; enter Andrew Price. I first heard of his tutorial on twitter from one of our environment artists who was doing it during lockdown. It turns out, nearly everyone was making doughnuts during lockdown. I got round to first doing it in October 2020. It took me about 2 weeks but by the end of it I had a nice pink doughnut with sprinkles and a cup of coffee; I was very proud. I then took those skills and quickly modelled a duracell battery I needed for a simple game I was making. 

Andrew takes you through modelling, sculpting, texture painting, lighting, material creation and more with a laid back confidence that's hard to find in tutorials. He doesn't talk to fast, he repeats things, explains when necessary as not to overload you with information and he's also very funny. It kind of feels like a 1-on-1 session with your favourite tutor at uni.

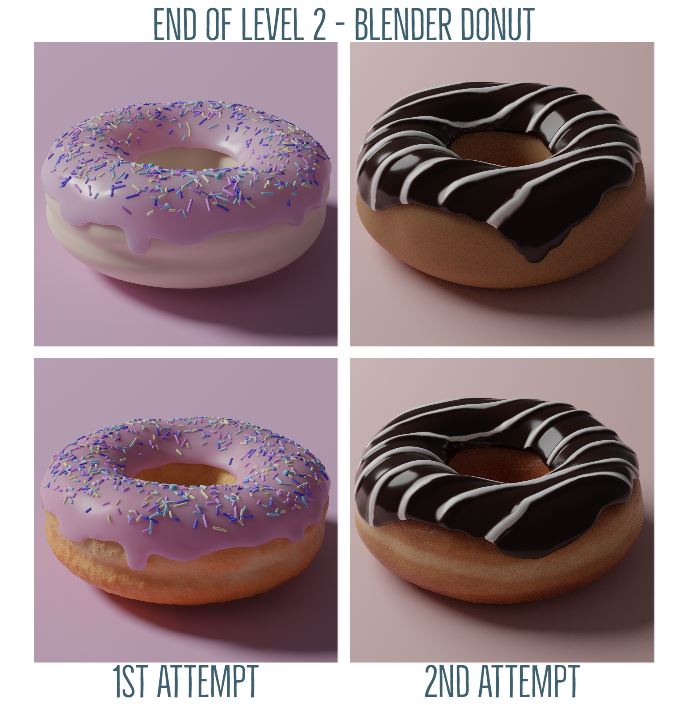
Part 1 focuses on becoming comfortable with the viewport and basic commands like rotate, scale and grab before moving onto sculpting a plain torus into a doughnut shape and creating some icing. Here's a comparison of my attempts:
BlenderGuru's Blender Doughnut Tutorial Review

I was pretty proud of that pink and milky white doughnut back in October but I've definitely improved. I've been doing quite a few material courses and learnt about the importance of roughness, subsurface and other factors like clearcoat. I also spent more time searching for appropriate colours instead of using the colour picker and spent time making sure my lighting was more realistic. Even though there are 3 more levels to go, it feels like I could use that chocolate doughnut as a low-poly stylized game asset.

BlenderGuru's Blender Doughnut Tutorial Review

Level 2 is all about texture painting and adding displacement to a mesh to make it more realistic. I spent a stupid amount of time at the end of this level trying to get the displacement of the donut texture just right. It was one of the major things that bugged me about the 1st donut; it was just too textured. It looks like mid-2000s CGI bread and this is supposed to be a donut. After studying lots of donut pictures and buying a donut myself (that I couldn't even eat because I'm gluten intolerant) I eventually ended up blending two noise textures together to get this slightly bumpy glazed look. Doughnuts are much smoother than you would think given it's a baked treat. It's still not perfect but much more realistic; even if it looks like it should have more texture. I'd like to spend some more time with the pinch and crease sculpting tools though to add some proper detail around the middle as it tends to fold in right where it's been cooking.

I also found that Adobe has a great website called Adobe Colour which allows you to upload an image and create colour palettes from it. You can easily copy the hex values to any program. 

BlenderGuru's Blender Doughnut Tutorial Review


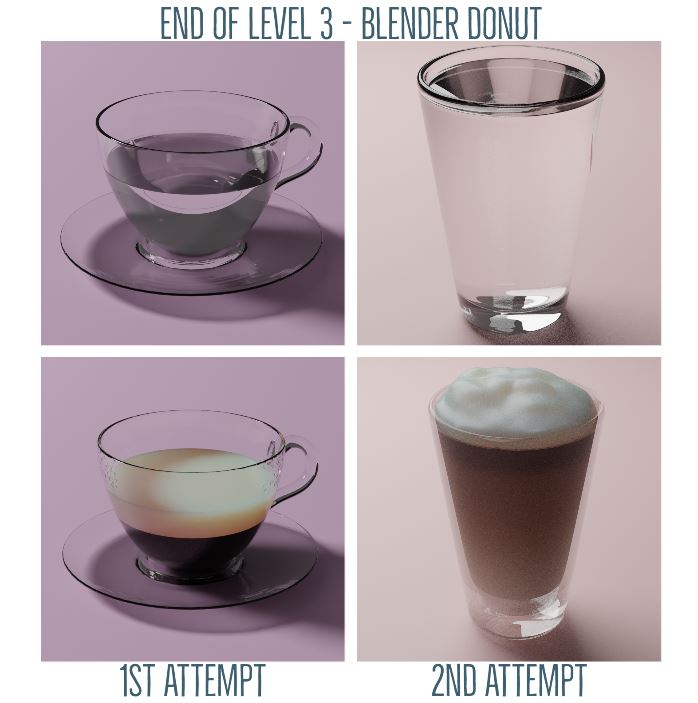
So the third level is the creation of a cup of coffee. I wanted to deviate from the one on the left and used my own reference image of a Bodum glass. They are my favourite glasses; I use them for everything as you don't get any condensation on the outside due to the fact they're double walled. Also, coffee looks beautiful in them as you can see the gradient and the liquid looks like it floating. At first, the glass was just reflecting the inside liquid material however, after messing around with the material settings of the glass I found that setting the alpha to 0.5 allowed you to see through it giving that double walled look. For the foam; instead of using the top part of the liquid mesh and applying a different texture, I duplicated the top face, extruded the edges downwards and then closed them to create a new mesh. This allowed me to deform the foam exactly how I wanted with the sculpting tools without ruining the rest of the liquid (like I did last time, you'll see later). I then stuck a noise texture on top to try and simulate bubbles.

In the first attempt, the liquid was created using volume absorption but I wanted that gradient look. I could've used the nodes in the material editor to procedurally generate it but I opted for UV unwrapping the liquid and then creating a gradient in PhotoShop and texturing it with that.

BlenderGuru's Blender Doughnut Tutorial Review

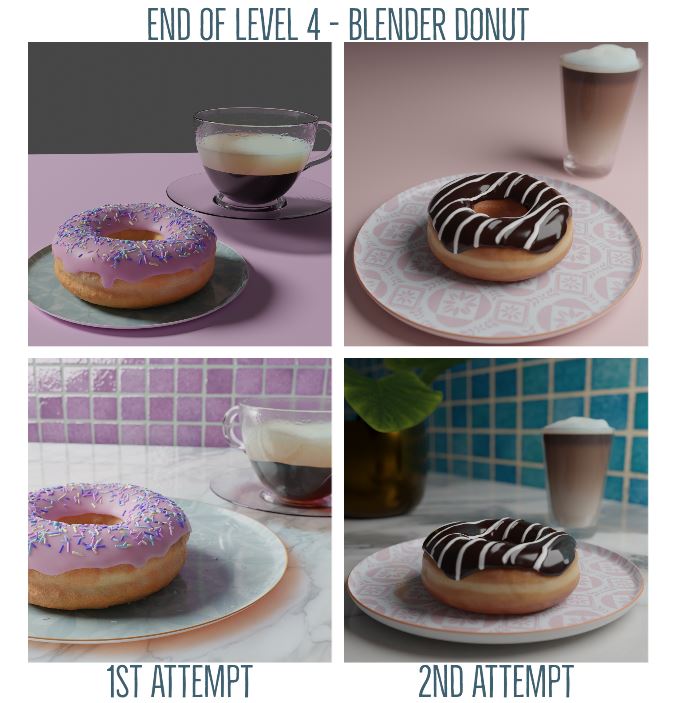
Level 4 is the final part where Andrew teaches you about depth of field, adding the background and creating an animated scene. I skipped animating it this time, mainly because last time it took my poor gtx 980 six hours to render 20 seconds. I'm incredibly happy with the progress I made this time round. I even added a simple gold plant pot. I didn't make the plant (that was from Quixel) but I did make the tiled print for the plate. I have plates just like these that I bought from Sainsbury's a while ago. I took a photo of them, created a 1k tiled print from it and applied it to the plate.

BlenderGuru's Blender Doughnut Tutorial Review

So there you have it; my donut attempts. I'll probably end up doing this series once more but without Andrew's videos. It's time to take the training wheels off and make a scene myself.