Friday, 26 June 2020

Chapter 14 // Exercise 16 - Principles & Practice Using C++

In this exercise I am using Visual Studio 2017 and the graphics files found here:
https://github.com/l-paz91/principles-practice/tree/master/Graphics%20Files

Chapter 14 // Exercise 16

Define a class Controller with four virtual functions on(), off(), set_level(int), and show(). Derive at least two classes from Controller. One should be a simple test class where show() prints out whether the class is set to on or off and what is the current level. The second derived class should somehow control the line color of a Shape; the exact meaning of "level" is up to you. Try to find a third "thing" to control with such a Controller class.

Github: https://github.com/l-paz91/principles-practice/tree/master/Chapter%2014/Exercise%2016


I really did not understand the point of this. It just made no sense to me. With the test class I don't know if he means to print it using shapes like a Text class in which case; we can't as we won't be able to attach anything to a Simple_window from within the Controller class or to print it using cout and display it in the console window.

He didn't specify what return type the functions had to be so I allowed show to return a shape that could be passed to the window to be displayed.

This exercise to me was a very confusing way of trying to get you to use inheritance. Maybe I completely misinterpreted it.


Chapter 14 // Exercise 16 - Principles & Practice Using C++

Chapter 14 // Exercise 16 - Principles & Practice Using C++

Chapter 14 // Exercise 16 - Principles & Practice Using C++

Chapter 14 // Exercise 16 - Principles & Practice Using C++

Chapter 14 // Exercise 16 - Principles & Practice Using C++

Chapter 14 // Exercise 16 - Principles & Practice Using C++

Sunday, 21 June 2020

Chapter 14 // Exercise 15 - Principles & Practice Using C++

In this exercise I am using Visual Studio 2017 and the header file found here:
http://stroustrup.com/Programming/PPP2code/std_lib_facilities.h

Chapter 14 // Exercise 15

Most class hierarchies have nothing to do with graphics. Define a class Iterator with a pure virtual function next() that returns a double* (see Chapter 17). 

Now derive Vector_iterator and List_iterator from Iterator so that next() for a Vector_iterator yields a pointer to the next element of a vector<double> and List_iterator does the same for a list<double>

You initialise a Vector_iterator with a vector<double> and the first call of next() yields a pointer to its first element, if any. If there is no next element, return 0. Test this by using a function void print(Iterator&) to print the elements of a vector<double> and a list<double>.

Github: https://github.com/l-paz91/principles-practice/blob/master/Chapter%2014/Exercise%2015


Damn, he really just threw us a curve ball with this one. Iterator is actually already taken though so I renamed it My_Iterator.

The most horrible thing about this example though is that it uses concepts that haven't been introduced yet. Sure he's briefly mentioned pointers and we all know what a reference is but lists?? Returning a specific element in a list as a pointer?? I didn't know how to do these things and it's good thing I have to deal with Pointer Engine 4 at work otherwise I can imagine 2018 me staring at stackoverflow answers in confusion for days.

Anyway, I'll go through this:
Chapter 14 // Exercise 15 - Principles & Practice Using C++

The Vector_Iterator is relatively simple. I use a static int to keep track of which element we are up to as static variables don't lose scope when their functions are closed. 

The only confusing part is line 43. &v_double[i++] essentially returns a pointer to where the specific element is. We don't want to return the actual element value which we would be doing if not for the &. A pointer is an address of a variable on your computer. 

You've probably seen post-fix ++ quite a bit in code online however it's very different to pre-fix ++ (which I personally prefer). Legendary programmer Scott Meyers in Effective C++ (excellent book) also advises to "prefer pre-fix increment unless the behaviour of post-fix is specifically needed". This is because post-fix creates a temporary variable, returns that, then increments and applies it back to the original variable. Here, the post-fix is specifically needed as if 'i' is incremented before then we can go out of range and we can't increment after a return.

The List Iterator is more confusing as I've never used a list before. They are doubly linked lists and behave completely different to a vector or array. The most annoying thing about them is that you can't access the elements using the subscript [] operator. There are a few ways to access specific elements of a list but you always have to start at the first element and then go forward N elements. I decided to use the standard library function advance() which takes in a list iterator and an int. The iterator will then become a pointer to the element we want at N.

The worst part is line 70. We need to return a pointer so & is needed. However, the iterator itself is also a pointer so we need to get the actual value by using a *. The & then returns a pointer to the de-ref value...I think. Either way, it's very confusing and this should not have been introduced at this stage...or I've completely over-complicated this.

Saturday, 20 June 2020

Chapter 14 // Exercise 14 - Principles & Practice Using C++

In this exercise I am using Visual Studio 2017 and the graphics files found here:
https://github.com/l-paz91/principles-practice/tree/master/Graphics%20Files

Chapter 14 // Exercise 14

Add an operation to Binary_tree that adds text to a node. You may have to modify the design of Binary_tree to implement this elegantly. Choose a way to identify a node; for example, you might give a string "lrrlr" for navigating left, right, right, left, and right down a binary tree (the root node would match both an initial l and r.

Github: https://github.com/l-paz91/principles-practice/tree/master/Chapter%2014/Exercise%2014

Thankfully, because I store all the nodes in a vector in order, I can simply have the user enter a number to identify what node they want. I'm very happy about this because the left right stuff sounds tedious as fuck.

The only problem is that our programs do not have a message loop (you need to press next), so capturing data from the user is a no. This means, the programmer needs to know how many nodes there will be to know exactly which one to select and add text to. It's not great but it will do for now. The text also resizes itself based on how big the tree size is.

Chapter 14 // Exercise 14 - Principles & Practice Using C++

Friday, 19 June 2020

Chapter 14 // Exercise 13 - Principles & Practice Using C++

In this exercise I am using Visual Studio 2017 and the graphics files found here:
https://github.com/l-paz91/principles-practice/tree/master/Graphics%20Files

Chapter 14 // Exercise 13

Modify Binary_tree to take a parameter (or parameters) to indicate what kind of line to use to connect the nodes (e.g., an arrow pointing down or a red arrow pointing up). Note how this exercise and the last use two alternative ways of making a class hierarchy more flexible and useful.

Github: https://github.com/l-paz91/principles-practice/tree/master/Chapter%2014/Exercise%2013


Like in the last exercise, I already have the information for the lines vector. So I added a function that allows you to change the line to arrow with a direction and colour. I also added the ability to change the size of the tree.

Chapter 14 // Exercise 13 - Principles & Practice Using C++

This class is starting to get a bit hacky/hardcoded.

Monday, 15 June 2020

Chapter 14 // Exercise 12 - Principles & Practice Using C++

In this exercise I am using Visual Studio 2017 and the graphics files found here:
https://github.com/l-paz91/principles-practice/tree/master/Graphics%20Files

Chapter 14 // Exercise 12

Modify Binary_tree to draw its nodes using a virtual function. Then, derive a new class from Binary_tree that overrides that virtual function to use a different representation for a node (e.g., a triangle).

Github: https://github.com/l-paz91/principles-practice/tree/master/Chapter%2014/Exercise%2012


So I kinda cheated on this one and didn't implement any virtuals. Instead of creating new classes and new version of draw_lines for each Binary_tree type I simply created an enum that holds a node shape and then in draw_lines() it checks the shape type and then draws that shape using the types we've already defined:

Chapter 14 // Exercise 12 - Principles & Practice Using C++

This way, their individual draw_lines() can be called without having to change init_node() at all...which I really didn't want to do because I already don't understand what I wrote and it was only a week ago.

Chapter 14 // Exercise 12 - Principles & Practice Using C++

Wednesday, 10 June 2020

Chapter 14 // Exercise 11 - Principles & Practice Using C++

In this exercise I am using Visual Studio 2017 and the graphics files found here:
https://github.com/l-paz91/principles-practice/tree/master/Graphics%20Files

Chapter 14 // Exercise 11

Define a Binary_tree class derived from Shape. Give the number of levels as a parameter (levels == 0) means no nodes, levels == 1 means one node, levels == 2 means one top node with two sub-nodes, levels == 3 means one top node with two sub-nodes each with two sub-nodes, etc). Let a node be represented by a small circle. Connect the nodes by lines (as is conventional). P.S. In computer science, trees grow downward from a top node (amusingly, but logically, often called the root).

Github: https://github.com/l-paz91/principles-practice/tree/master/Chapter%2014/Exercise%2011


My solution is disgusting and I'm not proud of it but I've already spent to long on this exercise. My problem is that I became obsessed with making sure all the nodes were perfectly spaced. As a result, if you go above a certain amount of levels it will go off the screen. I also wanted the nodes to be symmetrical.

Chapter 14 // Exercise 11 - Principles & Practice Using C++

Friday, 5 June 2020

Chapter 14 // Exercise 10 - Principles & Practice Using C++

In this exercise I am using Visual Studio 2017 and the graphics files found here:
https://github.com/l-paz91/principles-practice/tree/master/Graphics%20Files

Chapter 14 // Exercise 10

Define a class Pseudo_window that looks as much like a Window as you can make it without heroic efforts. It should have rounded corners, a label, and control icons. Maybe you could add some "fake contents", such as an image. It need not actually do anything. It is acceptable (and indeed recommended) to have it appear within a Simple_window.

Github: https://github.com/l-paz91/principles-practice/tree/master/Chapter%2014/Exercise%2010


I'd definitely say that no heroic efforts were made.


Chapter 14 // Exercise 10 - Principles & Practice Using C++

Thursday, 4 June 2020

Chapter 14 // Exercise 9 - Principles & Practice Using C++

In this exercise I am using Visual Studio 2017 and the graphics files found here:
https://github.com/l-paz91/principles-practice/tree/master/Graphics%20Files

Chapter 14 // Exercise 9

Define a Group to be a container of Shapes with suitable operations applied to the various members of the Group. Hint: Vector_ref. Use a Group to define a checkers (droughts) board where pieces can be moved under program control.

Github: https://github.com/l-paz91/principles-practice/tree/master/Chapter%2014/Exercise%209


This is pretty basic and it's all hardcoded so there's no full draughts game going on (yet...). I know he said to use a Vector_ref however I decided to use 3 Fl_Images for the board and pieces. There is actually only 1 light piece and 1 dark piece but they're just set to draw in multiple places to save on objects. 

The move location is stored in vectors of Rectangles which can easily be deleted and changed when a piece is overtaken. The move system works off directions like NorthWest. 

I don't think this is entirely what he meant in the exercise. I think maybe he wanted a group that contained a way to make a board, draw an image, draw a circle. I think that's kind of unnecessary considering you have everything you need grouped together anyway in Graph.h.


Wednesday, 3 June 2020

Chapter 14 // Exercise 8 - Principles & Practice Using C++

In this exercise I am using Visual Studio 2017 and the graphics files found here:
https://github.com/l-paz91/principles-practice/tree/master/Graphics%20Files

Chapter 14 // Exercise 8

Define a class Octagon to be a regular octagon. Write a test that exercises all of its functions (as defined by you or inherited from shape).

Github: https://github.com/l-paz91/principles-practice/tree/master/Chapter%2014/Exercise%208

.

Tuesday, 2 June 2020

Chapter 14 // Exercise 7 - Principles & Practice Using C++

In this exercise I am using Visual Studio 2017 and the graphics files found here:
https://github.com/l-paz91/principles-practice/tree/master/Graphics%20Files

Chapter 14 // Exercise 7

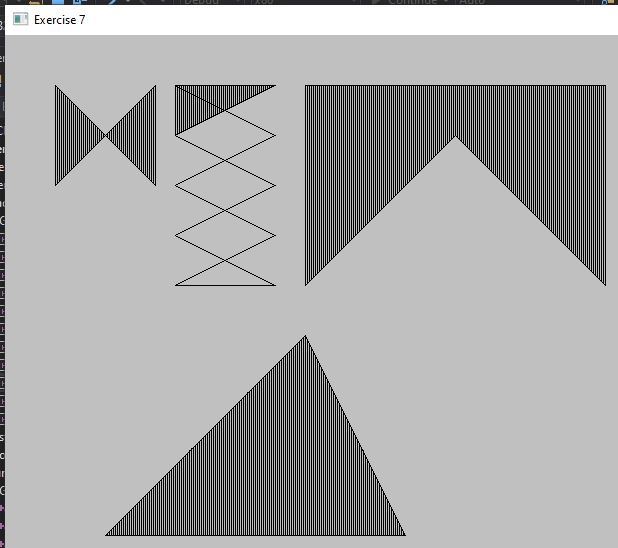
Define a Striped_closed_polyline using the technique from Striped_rectangle (this requires some algorithmic inventiveness).

Github: https://github.com/l-paz91/principles-practice/tree/master/Chapter%2014/Exercise%207


I'm not quite sure how I solved this one. It feels like I stumbled across the right answer somehow. It took some serious debugging to figure out what I was doing wrong (especially when I was almost there but a few lines kept being off by 1 pixel...)

I started off by creating a bounding box for the polygon. That way I could draw a line and see if it intersects with another line (this returns where the intersection happened). This is due to the fact that a closed_polyline might have gaps in it.
Chapter 14 // Exercise 7 - Principles & Practice Using C++


Chapter 14 // Exercise 7 - Principles & Practice Using C++

I then used the code from striped_rectangle to see how it looks:

Chapter 14 // Exercise 7 - Principles & Practice Using C++

This gave the line pattern; I just needed to figure out a way of only drawing part of it. I decided to go loop through each stripe and see if it hit the lines in the shape and push the intersection point back into a vector. Because it was testing each stripe individually the intersect points are pushback in order of corresponding x and y points. In some cases however, this can give more than 2 intersections. 


Chapter 14 // Exercise 7 - Principles & Practice Using C++

I am however stuck on shapes that have multiple intersections. To be honest I would just do a design like this in Photoshop or create a vector image in Illustrator. I feel this is adequate enough for the exercise.

I suppose eventually though I could write a new intersect function that checks for multiple line intersection and returns the closest intersection.

Monday, 1 June 2020

Chapter 14 // Exercise 6 - Principles & Practice Using C++

In this exercise I am using Visual Studio 2017 and the graphics files found here:
https://github.com/l-paz91/principles-practice/tree/master/Graphics%20Files

Chapter 14 // Exercise 6

Define a Striped_circle using the technique from Striped_rectangle.

Github: https://github.com/l-paz91/principles-practice/tree/master/Chapter%2014/Exercise%206


This one took me a while to solve as maths is not my strong point. I went through quite a few different methods (that didn't work). The main trouble for me is trying to find the correct formulas I need when I don't actually know the technical name for what I'm doing.

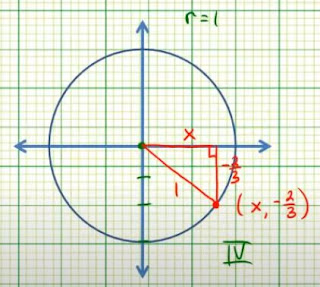
I knew the radius of the circle and the y co-ordinate of the line to draw; the x co-ord was missing. It took me a while to successfully google what I was looking for. This video was extremely helpful:
https://www.youtube.com/watch?v=egtrsPZ7THQ

We can solve for x by re-arranging the equation of a circle or using Pythagoras. Both need the use of sqrt() to solve. I decided to use pythag as it's nicer to look at.

Chapter 14 // Exercise 6 - Principles & Practice Using C++

Here is a snippet of the video to help visualise what has happened:
Chapter 14 // Exercise 6 - Principles & Practice Using C++
For a particular circle lets say the center is {200,200} and the radius is 100. The stripe width is 10. That means we know the length of the Y side is 10 and the length of the R side is 100. We need to find the length of the X side. Pythag is:
a² + b² = c² or in our case x² + y² = r²
Solved for x gives:
x² = r² - y²

You can then just square root X to get the length. When using fl_line() to draw the line, the length of the stripe is as simple as (centerX - X, Y) and (centerX + X, Y). Utilising some for loops; different sized stripes can be used to fill the circle.